DIY Epoxy Tumbler
Use this tutorial to make DIY resin tumblers that you can use or give as personalized DIY gifts!
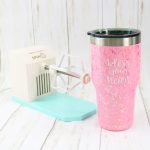
What You Will Need
- Tumbler
- Glitterific paint
- Spit It from We R Memory Keepers
- Epoxy resin
- Measuring cups
- Mixing cups
- Stir sticks
- Painter's tape
- Fine grit wet sandpaper
- Paintbrush
- Vinyl
- Transfer tape
- Cricut machine
- Bless your heart file or file of your choice
Instructions
- Paint your tumbler (if you want to).
- Once your tumbler is painted and dry, brush on a nice and even coat of the Glitterific.
- After the Glitterific is dry, you can remove the painter's tape and prepare to add your epoxy resin.
- Prepare your Spin It by ensuring the nut on the very end is tight. Adjust the turner to make it larger or smaller as needed.
- Let's apply the first coat of epoxy. Apply more painter's tape to the top and bottom of your tumbler. Put it a little outside of your glitter line so that the epoxy will lock in all of the glitter.
- Put the tumbler on the turner and make sure it fits tightly. Adjust it as needed.
- Epoxy will get all over the place, so cover and protect both your work surface and the base of the Spin It before you begin spinning.
- Prepare resin according to the package directions.
- Turn the Spin It on and start spinning at a low speed. tart pouring the prepared resin onto your tumbler. I used a stir stick to push the resin around to make sure I had complete and even resin coverage.
- Allow the epoxy tumbler to spin while it cures.
- After an hour or two, the epoxy should be set enough that you can remove the tape from the top and bottom.
- Once the resin is set, stop spinning. Leave the tumbler on the machine to continue curing overnight.
- Spray your epoxy tumbler with water and sand down the entire tumbler, making sure to sand down any imperfections.
- Use rubbing alcohol to thoroughly clean the entire surface and dry well before continuing.
- Apply transfer tape to add a vinyl design to the outside of your glitter tumbler.
- Peel back the backing paper and apply the design to your tumbler with the transfer tape.
- Burnish well, then peel back the transfer tape to reveal your design on the tumbler.
- Add a second coat to your epoxy tumbler to seal the vinyl and complete the project. Just follow the same process you used to add the first coat.