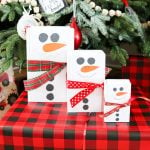
DIY Gift Box for the Holidays
Make your own Christmas gift boxes that look like snowmen in minutes!
Equipment
- Paint Brush
- Ribbon
- Black marker
- Tape
What You Will Need
- Wood Matchboxes
- Vinyl in Orange and Black I used regular orange and glitter black from Cricut (this one is great for all of those vinyl scraps as well!)
- White Paint
- Pink Paint
Instructions
- Start by carefully removing the packaging that is around the matchbox. We will be reusing this in our project. Just set aside until a bit later in the tutorial.
- Paint your wood box with a few coats of paint. Be sure to allow to dry in between coats. You will want to paint both the inside and the outside of both pieces.
- Once dry, take the paper piece that was wrapped around it in the first step and turn it inside out. Put back around the box with the white part to the outside and secure with some tape in the back.
- I cut the snowman parts from the vinyl by hand. The pieces look fine with a rustic imperfect cut as that is part of the charm of these snowman boxes. If you want a cleaner cut, you can use your Cricut machine to cut the nose, eyes, and buttons. Otherwise, just cut with a pair of scissors.
- Peel the backing from each of the pieces and add to the white cardboard that is around the box.
- Tie a piece of ribbon around the entire box. This should look like a scarf on your snowman so put it under the nose but above the buttons.
- Then use a black marker to draw a squiggly mouth as well as add some character to the carrot nose.
- You can also use pink paint to add some rosy cheeks to your snowman. I just dipped my finger in the paint and made a circle on each side of the mouth.
- Allow the paint on the cheeks to dry completely. You can then slip off the ribbon as well as the outer cardboard piece and add your gift to the inside of the box. Then slip your pieces back on and you have a DIY gift box that everyone will love! You can add a gift tag to the ribbon scarf or write on the back of your cardboard piece.