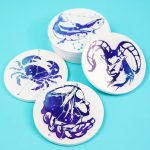
Infusible Ink Coasters with Constellations
Make this constellation craft with Cricut Infusible Ink and use in your home or give as a gift.
What You Will Need
- Cricut Explore Air 2 or any other Cricut machine
- Cricut EasyPress
- Infusible Ink Ceramic Coasters look for the ones with the Cricut logo
- Cricut Infusible Ink transfer sheets I love the galaxy patterns for this project but you will want to remember to look at the color on the outside of the box as the color of these sheets themselves will be muted.
- Textured Permanent Vinyl in Metallic Silver
- Transfer Tape
- Heat Resistant Tape
- EasyPress Mat
- White cardstock
- Lint-free cloth or lint roller
- Butcher paper
- Weeding tools
- Brayer
- Tweezers
- Scraper
- Constellation Design Space file
Instructions
Making Your Designs in Cricut Design Space
- You can pull up this file in Design Space and you can make the signs that I have already designed. Want to make other zodiac signs? I have instructions for adding any that you want below.
- Click images and search for constellation. You will see the images below that you can choose from. Insert the ones that you want to make.
- Resize to 3 inches maximum on the largest dimension.
- Ungroup and detach what you have inserted. Then delete the draw layer. Next, you want to get a good idea of what this will look like on a coaster so add a circle 3.6 inches in diameter to your canvas.
- Turn the circle white and click arrange to move to the back. Move your design over the coaster to get an idea of what it will look like. Size the design to fit. You want the constellation itself to be as large as possible.
- Change the color of both the Infusible Ink and the vinyl pieces to be the same so they cut from the same sheet. Delete the circle you added to the canvas. Now repeat for each sign you would like and move to cutting your constellation craft.
- NOTE: If you remove any unneeded small features using the contour button, it will make the Infusible Ink easier to cut and weed. Just look for super small pieces that may not be needed in the design overall and click on them in the screen below.
Cutting Cricut Infusible Ink
- Add the Infusible Ink to your mat with the ink side up. Always make sure your hands are clean and dry when handling the transfer sheets. I like to use a brayer to press the sheets down on the mat.
- IMPORTANT: Mirror your design when cutting Infusible Ink Transfer Sheets.
- Turn your Explore dial to custom if you are using the Explore machine. Choose Infusible Ink Transfer sheets in Design Space then cut your sheets with the fine point blade.
- Load the mat and press the "C" button to cut when prompted. For this project, you will also want to cut your vinyl. This is placed face up on the mat and there is no need to mirror. Be sure to change your material setting to textured vinyl when cutting.
- NOTE: For Infusible Ink, I like to check my cut BEFORE removing the sheet from the machine. So, once the cut is complete, check a small piece to ensure it is cut through the sheet and not the transfer sheet underneath. If it is cut through, press the arrow button to unload. If it is not cut through, press the "C" to cut with another pass.
Weeding Cricut Infusible Ink
- Now that you have your pieces cut, you will need to weed before completing your constellation craft. For Infusible Ink, you will want to bend the sheet slightly in both directions "cracking" the sheet. Then remove the outside piece as well as any pieces inside with your hands. You can use tweezers if you need to but don't use weeding tools on Infusible Ink.
- You will also want to weed your vinyl piece. Use weeding tools to weed around the outside as well as anything that needs to be removed in the center. Repeat for all of your cut designs then move on to pressing.
Adding Infusible Ink to Ceramic Coasters
- You will want to make sure your coasters are completely clean before beginning. You can either wipe them with a lint-free cloth or even run a lint roller over each one.
- Add the Infusible Ink piece ink side down on the glossy or top of your coaster. Remember that the matte side of the ceramic coasters is the bottom. Press the design down well as the carrier sheet itself is sticky.
- You do not want this to move at all while pressing so I like to add about three pieces of tape around the outside edge.
- Then place each coaster UPSIDE DOWN on the EasyPress mat covered in white cardstock. If you don't have white cardstock, you can also use 4 sheets of butcher paper.
- Repeat for all of your coasters. You can press four of these at one time with the 9x9 EasyPress.
- Check the Cricut heat guide for the appropriate time and temperature and heat up your EasyPress. NOTE: Always press Infusible Ink in a well-ventilated area. Then cover the coasters with a piece of butcher paper that is larger than the EasyPress. Add your EasyPress to the top and start the timer. There is no need to press at all. Just allow it to heat for the full time.
- Once the time is complete, lift the EasyPress and allow the coasters to cool completely before handling. This is the hardest part of this project, but it is imperative!
- Once cool, peel back the carrier sheets to reveal the gorgeous designs underneath!
Adding Vinyl Constellation to Coasters
- Now that your Infusible Ink design is on the coasters. you can add some vinyl constellations to the top! Add the transfer tape to the vinyl and burnish well. Peel back leaving the vinyl on the transfer tape. Then add to the coaster in the correct location. Burnish down well and remove the transfer tape.
- Use your scraper to make sure that the vinyl is stuck really well. Repeat using the same piece of transfer tape for as many coasters as you have. Remember to allow the vinyl to sit for at least 72 hours before using these coasters.