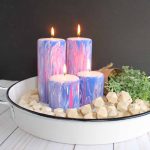
Marbling with Acrylic Paint on Candles
Marbling with acrylic paint is a hot new trend. I can see doing this easy craft on just about any surface frankly. Today I thought I would try the technique on candles for a fun home decor accent. They turned out amazing and I can't wait to share the technique with you! This post is sponsored by Testors, however, all projects and opinions are my own.
What You Will Need
- Testors Marbling Medium
- Testors Craft Paint in your choice of colors
- Candles
- Craft sticks
- Disposable cups both large and small
- Cardboard box
- Painter's tape
Instructions
- In small disposable cups, mix the marbling medium with your selection of paint colors in a 1 to 1 ratio. Allow to rest for a few minutes to minimize air bubbles.
- In the meantime, cover any areas where you don't want to paint with painter's tape. I covered just the top of my candles.
- When the air bubbles have settled, begin dripping the mixed paints all over your candles. The paint will immediately start to run together and marble as the sides are not flat.
- Use craft sticksto push the paint around sthe candle to cover the surface.
- Once you have painted all the way around your candle with paint, use a large disposable cup to hold the candle up while it continues to drip and dry.
- Use the cup to help you turn the candle all the way around and check for any areas that still need paint. Add more paint or use a stir stick to push around the paint that is already on the candle to cover those areas as desired.
- Set aside and allow to dry for about 24 hours. Carefully remove from the cups once dry and cut away any excess dried paint with a craft knife. Then enjoy your marbled candles!