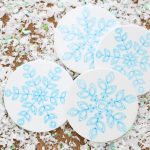
How to Make Infusible Ink Ceramic Coasters
Infusible Ink ceramic coasters are easy to make as a professional set of coasters all in a few minutes. That means that this is the perfect gift idea for the holiday season!
What You Will Need
- Infusible Ink Pens I used the new watercolor set
- Cricut Ceramic Coaster blanks
- Cricut cut file
- EasyPress Mat
- Cricut EasyPress
- Lint-free cloth
- White cardstock
- Butcher paper
- Heat resistant tape
- Blue cardstock 2 shades
- Black Cricut pen
- Twine
- Copy paper
- Scissors
Instructions
Step 1: Prepare the designs.
- Start with the file in Cricut Design Space. Click make it and draw the designs for your Infusible Ink ceramic coasters on copy paper.*
- Use the two blue markers in the watercolor pen pack to draw the designs.
- Once your design has been drawn, cut the paper as close as possible to the designs. Please note that Infusible Ink colors will brighten once pressed.*
Step 2: Prepare the Coasters
- Open your package of ceramic coasters and clean each one with the lint-free cloth. You will be putting the images on the smooth side of the coasters. The matte or rough side is the bottom of the coaster.
- Note that Infusible Ink does require a sublimation surface. This will not work with ceramic tiles from your home improvement store.
- Add the side of the paper that was drawn on by the Cricut to the top side of each coaster.
- Use heat-resistant tape to secure each piece into place. Try to avoid where the writing is when taping. Tape well and keep the paper tight onto the surface.
Step 3: Using the Cricut EasyPress to infuse your design.
- To infuse your design, place an EasyPress mat on your work surface then add a piece of white cardstock on top of that.
- Place the coasters FACE DOWN on the cardstock. The paper you placed on top of the coasters should be against the white cardstock.
- Then add butcher paper over the top of your coasters to protect your EasyPress.
- Place your EasyPress on top of the stack and press according to the instructions on the Cricut heat guide. There is no reason to hold or press down on the EasyPress. The weight of the machine itself is enough.
- Once the time has elapsed, remove the EasyPress and allow your coasters to cool completely. This will take 10 to 15 minutes at a minimum. Do not touch the coasters while hot! They will burn you!*
- Once the coasters have completely cooled, remove the tape and paper from the front of each coaster to reveal the design. These coasters are done and ready to use as soon as you remove the paper.
Notes
*Make sure the copy paper you use is rated for use in a laser printer so it can handle the heat.
*Do not be discouraged because your colors are not very bright on the paper. Please note that Infusible Ink colors will brighten once pressed.
*After this project, discard the white cardstock from underneath the coasters as it will have some ink on it and this can ruin other projects.