Burlap Garland: Snowflakes with Your Cricut Maker
You can make this burlap garland in just a few minutes with your Cricut Maker. An adorable farmhouse-style banner for your winter decor.
What You Will Need
- Cricut Cutting Machine
- Cricut felt you will need the carousel sampler
- Burlap
- Tacky glue
- Pouncer brush
- Parchment paper
- Strong Grip Transfer Tape
- Twine
- Cricut Spatula optional
- Snowflake cut file
Instructions
- Start by preparing your burlap. You can see my full method for cutting stiff burlap on the Maker here.
- Mix tacky glue and water half and half in a disposable cup. Don’t forget to protect your work surface with parchment paper.
- Then, lay 12 x 12 squares of burlap on the parchment paper. Then, use a pouncer brush to apply the glue and water mixture to one side of the burlap squares.
- Allow the burlap to dry overnight.
- Now that the burlap is stiff, it’s ready to use for your cutting projects. Using this method will ensure that the burlap will hold together when cutting intricate cuts like these snowflakes. I would not attempt this particular project without stiffening the burlap first.
- Working with your stiffened squares, cut your snowflakes from the felt and burlap.
- To cut from the felt, place your felt on the fabric mat and press down well. Change your blade to the rotary blade when prompted in design space. Then, cut the snowflakes from the felt.
- Then, you need to cut the burlap. You will need two burlap pieces for every one felt piece.
- Place strong grip transfer tape on the back of your stiffened burlap piece.
- Place this transfer tape side down onto a Cricut mat. I find that either the medium or strong grip mat works best.
- Then, cut your burlap snowflakes using your Cricut Maker and the rotary blade. Use the burlap or heavy fabric setting, but set the machine to less pressure.
- If you are confused about cutting the burlap with this method, click here for more explanation.
- You should now have one felt piece and two burlap pieces for every snowflake you want on your burlap garland.
- Then use tacky glue to add the burlap pieces to both sides of the felt pieces and allow them to dry completely.
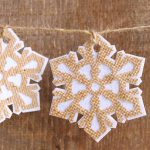
- Now, string the snowflakes using twine to create a burlap garland for your home!
Notes
This spatula works great for helping to remove the burlap pieces. Just work it between the burlap and the transfer tape. You will need to be extremely careful as the parts are still fragile even though they are stiffened.