DIY Vintage Crate with The Home Depot
Let’s do something with a little farmhouse flair today. Let’s make a “vintage” crate. Y’all know how much I like to fake vintage items. You can give your home a vintage touch with some farmhouse flair and spend just a few dollars.
What You Will Need
Instructions
- Start by staining all surfaces of the box, if desired. Allow to dry completely.
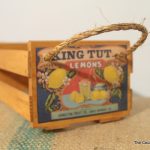
- Print and trim the labels according to the size of your crate. I found printable vintage fruit crate labels and hit the jackpot over at Vintage Holiday Crafts!
- Cut your labels out and apply a layer of Mod Podge to the BACK of your labels and let dry. Don’t apply them yet.
- After that coat dries, then apply a coat of Mod Podge to your crate and apply the label.
- Next, mark where you want the holes for the rope handles on your box.
- Drill large enough holes on both sides for the rope to run through.
- Run your rope handles through both holes and tie it off. Trim any excess rope.
- Fill your crate and display!