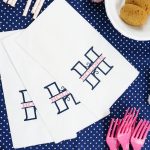
How To Make Custom Napkins Using Heat Transfer Vinyl
Easily make affordable and unique custom napkins using this process with heat transfer vinyl.
What You Will Need
- Napkins
- Heat transfer vinyl
- Cricut machine
- Cricut cut file
- EasyPress
- EasyPress Mat
- Teflon sheet or parchment paper
Instructions
- Cut your split letter monogram (or another design) from heat transfer vinyl. Don't forget to mirror your design and cut with the shiny side of the heat transfer vinyl against the mat.
- Next, weed away all excess vinyl from the backing sheet. Follow the same process for both colors so that all you have left is what you want to be transferred to your napkin.
- Now locate your design on the napkin. Press both colors onto the napkin (either at the same time or separately.
- To press, add the napkin to your EasyPress mat (or use a rolled-up towel). Then add your first color of heat transfer vinyl on top.
- Protect the napkin from the heat with a Teflon sheet (or parchment paper).
- Place the EasyPress on top for the amount of time and temperature recommended for the paper.
- Allow it to completely cool before pulling back the backing sheet from the iron-on.
- Next, place your second color on top.
- Repeat the same procedure by adding the protective sheet over the top and pressing with the EasyPress.
- Then allow to cool completely and remove the carrier sheet.