How to Make a Banner from Photos
Today I am going to show you how to make a banner from photos. I am making mine in a wedding theme but you can use this same idea for parties and so much more. Photos personalize this banner for just about any occasion. If you have a DIY wedding coming up, you are going to love how easy this photo banner is to make.
Makes 1 banner
What You Will Need
- Photos I am using black and white but color is fine as well
- Heart pennant shapes I purchased these hearts already painted black but you can get raw wood hearts and paint them instead.
- Black twine
- Letter stickers
- Printable pennant template
- Hole punch
- Scissors
- Craft knife
- Self-healing mat
Instructions
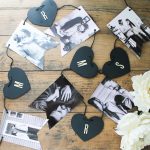
- Start by printing the pennant template and the pictures you will use for the banner (I used 4x6 prints).
- Cut the pennant template from the paper then lay it on top of each photo. Use the craft knife on your self-healing mat to trim each picture the same size and shape as the template. Use a hole punch to put a hole in both of the upper corners of each picture. Repeat for all of the pictures.
- Add a letter sticker or vinyl cut in letter shapes to the center of each heart. Spell whatever you want your banner to say.
- Then use twine to string your items together into a banner. Start with a photo and add one heart between each picture.
- Continue alternating pictures and hearts until the end. Again, end with a photo just like you started. Hang.