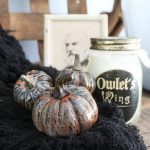
Marbled Pumpkins with Resin
If you love glassy pumpkins, this craft is for you! Using a marbling technique, you can turn cheap, foam pumpkins into beautiful fall decorations for your home. This project uses Halloween-themed colors, but you can use any colors you would like on this project.
What You Will Need
- EnviroTex Lite Pour On High Gloss Finish
- Plastic Pumpkins buy black ones or paint existing ones
- Castin’Craft Opaque Pigments in the colors of your choice
- Skewer and Toothpicks
- Foam Block
- Stir Sticks
- Measuring Cups
- Mixing Cups
- Cardboard
- Protective gloves
- Craft knife
Instructions
- Start by adding a sheet or cardboard down to protect your work surface.
- Add wood dowels or skewers to the bottom of each pumpkin. Then, stick the dowels into a foam block to keep everything still while you are marbling.
- Remove any stem in the top of your pumpkins as well. Then, insert another dowel or skewer in its place to protect this area. We will be adding the stems back to the pumpkin after the resin is dry.
- Mix your resin according to the package instructions. Be sure to wear protective gloves and follow all instructions that come with your packaging.
- Then, tint a little bit of orange and a little bit of white.
- Then, begin dripping the mixed resin onto the pumpkins, adding as many colors as you would like.
- Once you are happy with your marbled pumpkins, allow to cure overnight, then remove the two skewers. You may need a craft knife to cut away the cured resin in order to remove.
- Add your stem back to your pumpkins. You may need to hot glue or super glue. Now, they are ready for a fun and spooky display!
Notes
If you are painting your pumpkins before marbling, make sure the paint is completely dry before continuing with the remainder of the project.