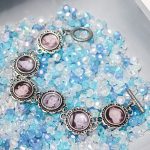
DIY Charm Picture Bracelet
If you’re looking for a special DIY gift idea for mom or grandma, look no further than this DIY charm picture bracelet. Filled with pictures of all their favorite people, this bracelet is the kind of gift that will make her cry tears of joy!
What You Will Need
- Frame Charms
- Printed Pictures
- Craft knife
- Mod Podge
- Mod Podge Dimensional Magic
- Toggle and Closure Set
- Silver Jump Rings
- Jewelry Pliers
Instructions
- Measure your frame charms, then print your pictures as close as you can to the correct size. Trim any excess paper away.
- Use your finger to push the picture into the frame.
- Take the craft knife and use it to mark all around the outside edge. Avoid cutting entirely through the picture.
- Remove the picture from the frame and trim all the way around the picture so that it fits snugly into the charm without having excess.
- Use Mod Podge to adhere the photos to the frames. Be sure to coat the top of the picture with 2-3 coats and allow time to dry completely after each coat.
- Add Mod Podge Dimensional Magic and allow it to dry completely.
- After the photos dry, add jump rings in between the frames with your pliers.
- Using jump rings, attach the toggle and closure to the ends of the bracelet. Your photo bracelet is complete!