How to Make Sublimation Photo Blankets
If you've ever wanted to make your own photo blankets keep reading to learn how to use a sublimation printer to create sublimation photo blankets!
Makes 1 Blanket
Equipment
- Sublimation Printer
- AutoPress
- Heat Resistant Gloves
- Paper Cutter
- EasyPress Mini
- Large Black Mat
- Tape Dispenser
What You Will Need
- Sublimation Photo Blanket
- Sublimation Ink
- Sublimation Paper
- Heat Resistant Tape
- Lint Roller
- Artesprix Protective Paper use code CCC10 for 10% off
Instructions
- What is a Sublimation Print?
- A sublimation print is an image printed on sublimation paper with sublimation ink from a sublimation printer.
- Because of my sublimation blanket blanks, I printed my images full-sized.
- Don't trim your images just yet, we'll talk about what size to trim them to shortly.
- Let's Make a Sublimation Photo Blanket
- To make our sublimation photo blanket we need to get some measurements.
- How to Measure Your Blanket
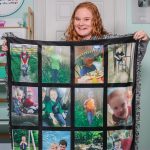
- My blanket itself is pretty large. You can see a portion of it in the photo below. The white areas are where we will be sublimating our photos.
- We need to measure each white rectangle. I can't stress enough not just to trust the measurements that come with the blanket or with the listing.
- Lay the blanket flat and measure in a few spots across the white area.
- What Size Should I Make My Prints?
- Once we have the measurement of our sublimation area we can prepare our sublimation print.
- Because the outside edge of the sublimation area is black I want to make my prints slightly oversized. I am setting mine to 1/8" larger on all sides.
- Even though the outside edge is black getting sublimation on it could still result in a line showing.
- I don't want to get too much sublimation on the black portion.
- If your goal is to prevent any sublimation from the black you could either cut your prints to the exact size as the white area or take long strips of heat-resistant tape and line the edge of your white areas. Sublimation wouldn't get on the tape.
- I don't want to use that much tape and I don't want my print to end up being too small so I'm going to add my print just a little oversized.
- I'll show you a close-up of the finished product so you can see how it looks.
- Bottom line; measure the actual blanket! My blanket measurements were not the same as the Amazon listing.
- Trim Prints to Fit Sublimation Blanket
- I printed all of my images the full size my printer would allow on an 8.5" x 11" sheet of paper.
- I am making my finished print 10.5" long by 8" wide. To do this I'm using my paper trimmer and I am trimming one side right at the end of the print.
- Let's start with the long side. Trim one end right at the end of the print and then turn it around and line it up on the 10.5" mark and trim off the excess.
- Now we're going to trim one side of the short side right along the edge of the print and then turn it and trim the other side at 8".
- Now I have a perfectly sized print for my sublimation areas. Repeat this process for each photo.
- How to Apply Sublimation Prints
- Because of how this blanket is set up we're going to pre-press each panel to make sure all of the moisture is out of it.
- I am using my Cricut Autopress, because the mat that comes with the Autopress is so cushioned I am removing it and using a firmer heat-resistant mat. You could use a heat-resistant mat, Nomex pad, or if you're using a different Heat Press you're probably fine with the mat it comes with.
- If you're using an EasyPress I would not use the EasyPress Mat, use something a bit firmer for this project.
- After you pre-press, lint roll the area really well to remove any lint, dust, hair, etc.
- Now we're going to add our sublimation print. Take your time to line the print up very carefully. If you trimmed your photo to be slightly larger than your sublimation area make sure it's just onto the black area.
- Use heat-resistant tape to hold the print into place.
- I am pressing one panel at a time because they fit within the heated area of my Autopress.
- Once the sublimation print is in place add protective paper over the top and then press.
- My blanket instructions recommend 360 degrees for 60 seconds. Make sure you check wherever you purchased your blanket for the correct settings.
- After the press is complete remove your sublimation print and then move the entire blanket to the next panel.
- How to Protect Your Sublimated Areas
- You need to make sure the panels you've already sublimated are hanging outside of the press area of your heat source.
- Because I'm using the Autopress I can slide the blanket right through the back.
- Follow the correct process for each sublimation print. Pre-press, lint roll, apply print, and cover with protective paper. Press for the maximum temperature for the full time and continue this way for each panel.
- Pro tip - map out where you want each sublimation print and move from one side to the other.
- I started in the upper left corner and moved across the top row and then down one row.
- If you move around and leave the middle portion for last you may not be able to press that portion without applying heat to a previously sublimated area.
- I picked a blanket where each of the panels fit in the heat press I have. I would recommend that for the best results. Press one sublimation print at a time.
- Another tip - check and double-check that your images are orientated correctly. Applying a print upside down will ruin the entire blanket.
- Making a larger blanket like this is really easy as long as you pick the right size for your printer and heat press setup.
- I did want fewer tape marks so I tried as little tape as possible. I found about eight pieces of tape per panel helped to hold the image in place so I didn't have any white areas along the edges.
- How to Prevent White Edges Around the Photo
- To prevent having white edges around the photo I lined up one corner of my print, taped it down, and then proceeded to each of the four corners.
- Be aware that the fabric will stretch as it hangs off the heat press. This can stretch out the sublimation areas. I used my fingers to pull them back into shape while taping them down.
- You have to do this with every single panel. These blankets do take a while to make so be prepared for that.
- I found I got better at locating my designs the more I did. By the end of the blanket, I was pretty good at locating the design just right.
- This blanket comes in a set of two, so you could definitely do one as your test or your experiment and then do the other.
- How to Remove Sublimation Tape Marks
- After I finished sublimating this blanket I threw it in the washer and dryer to see if the tape marks would come out.
- You can see them less after washing and drying but you can still see them in the photo below.
- While I was making my blanket I tried two different brands of tape to see if it would happen with both of them.
- After applying heat the tape was kind of pulling some of the black on the blanket. It may just be because I purchased an inexpensive blanket from Amazon but I wanted you to be aware of that happening.
- Use Your EasyPress Mini to Remove Tape Marks
- I like to use my EasyPress Mini and run it over the tape marks. I do this with almost all of my fabric sublimation projects.
- As long as you don't leave the heat in one place for too long it shouldn't affect the sublimation.
- Run the Mini over each of those areas and you should see the tape marks almost disappear.