UV Color Changing HTV from Cricut
Color Changing HTV is a regular Iron-on material that can be used like any other HTV. You can use it on any surface you can use a regular iron-on material on.I recommend using it on projects that will get sunlight since that changes the color.I am using my favorite Bella+Canvas shirts for today's project. With over 300 colors to choose from, you're sure to find a color perfect for your project.
Equipment
- Weeding Tool
- EasyPress
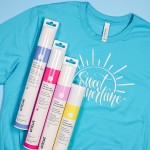
- Sweet Summertime Free SVG
What You Will Need
- BELLA+CANVAS Shirts
- Color Changing HTV
Instructions
How to Make a Color Changing HTV Shirt
- To make my project I started with the design in mind. Knowing the project you want to make and the design you want to use will make choosing the right color blank easier.
- My sweet summertime design has three colors and I'm going to cut each of them out with my Cricut machine.
- Cutting color changing HTV is the same as cutting other HTV materials. I am using a blue LightGrip mat. You'll want to place the material on the mat shiny side down.
- Make sure the material is stuck down really well. I like to use a brayer to really stick it to the mat.
- Because this is an iron-on material make sure you mirror each mat of iron-on.
- I found that the Everyday Iron-on setting worked fine for this project so we can select that material setting and load the mat into our machine.
- Press Go to cut out the design.
How to Weed Iron-on
- Color Changing HTV weeds exactly the same as other HTV materials.
- Use a weeding tool to remove all the excess HTV material. Don't forget the inside of the letters.
- This HTV weeds very easily with the weeding tool. I had no problems getting it to weed at all.
- Weed each color of HTV and make sure you place what's left back in the correct tube right away so you don't mix them up.
How to Layer Color Changing Iron-on
- Here are all three pieces we cut out and weeded. Although these pieces are all different colors you cannot tell at this point.
- This is why it's important to make sure your t-shirt will look good with white HTV and with the different colors you use when they're in sunlight.
- Before we apply the HTV to our shirt we need to make sure it's laid out how we want it.
- I've moved mine around to make sure they're layered exactly how I want them. You can tell in the photo above that the bottom of the T in sweet is the cross to the T in summertime. This does make it a little easier to make sure things are laid out correctly.
- With everything laid out how I want it I'm going to remove the HTV from the shirt and prep the shirt for pressing.
How to Prepare a Shirt for HTV
- For UV Color Changing HTV and a 100% cotton shirt the settings are 315 degrees for 30 seconds.
- To prepare our shirt we need to pre-press it for about 5 seconds to make sure all the moisture is removed from the fabric.
- I am using my large EasyPress 3 because it will cover my whole design.
- If you're using a larger design or a smaller EasyPress you can press the design in sections.
How to Press UV Color Changing HTV
- With all the layers located where I want them on the shirt I am going to remove 2 layers and press the Summertime layer first.
- Remember this only changes with UV light so it will not change with the heat. It will still be white after the heat is applied.
- Because we're layering this iron-on I'm going to press the first two layers for less time because they'll end up being pressed more than once.
- I'm pressing for about half the time that is called for for the first 2 layers.
- This product is a cool-peel HTV. Even though we're pressing it for less time you want to let it cool before you peel back the carrier sheet.
- Go slowly as you peel back the carrier sheet to make sure everything is stuck down and releasing from the carrier sheet.
- Don't throw away the carrier sheet. We're going to use this to protect the iron-on from the heat plate of the EasyPress when we press the other layers.
How to Press Middle Layers of HTV
- For the second layer of HTV we're going to locate it in the correct position. I want the t's to overlap correctly.
- With that piece in place we're going to replace the carrier sheet over summertime so none of the EasyPress is sitting right on top of the HTV material.
- For the second layer we need to press for about half the time again. We don't want to press for too long because we have one more layer to press on top of these.
- Allow the HTV to cool and then peel back the carrier sheet from both layers. Remember to keep those carrier sheets.
How to Press the Top Layer of HTV
- For the top layer of the design we're going to locate the the sun piece right where we want it.
- With it in place the whole word "Sweet" is covered with the sun carrier sheet.
- I am going to replace the carrier sheet over the top of summertime so all the HTV is covered.
- Since this is our last layer we're going to press with firm pressure for the full time. That is 315 degrees for 30 seconds.
- Allow the HTV to cool before trying to remove any of the carrier sheets.
- Slowly peel the carrier sheet back making sure the design is stuck down well everywhere.