Easy Painted Clay Pots
Grab your terracotta pots and make something amazing with this marbled paint technique and a stencil cut on your Cricut machine!
Equipment
- Paintbrushes
- Protective gloves
- Plastic bin
What You Will Need
- Clay pots Any size of terracotta pot will work with this tutorial, however, a larger surface is easier for the stenciling portion.
- Paint I like to use a paint that says it is good for terracotta to make this project go a bit quicker. One of my favorites is Patio Paint.
- Spray paint in a contrasting color
- Stencil see options below for making a stencil on your Cricut machine
- Sealer something good for outdoor use
Instructions
Painting Clay Pots
- Whatever planter pot you will use for this project, you will need to paint it first. I recommend painting the outside and the inside of terracotta. This will prevent moisture from ruining your painted finish.
- I painted my pot with white Patio Paint. The lighter the paint color, the more coats of paint will be required. Paint on one coat, allow to dry, then add another coat. Allow all coats to dry completely before continuing with this project.
Adding Spray Paint Marbling
- Now that you have a painted pot, it is time to add a paint marbling effect with spray paint. Add water to a plastic container outdoors. You want the container to be large enough to fit most of your pot and something that is old that you will not be using again.
- Spray the spray paint directly on the surface of the water. You will want quite a bit of paint here. I am using one color but you can use several colors all at once.
- The spray paint will float on top of the water. You want to immediately paint dip your items.
- Dip in your painted pot. Be sure to wear protective gloves for this entire process as you will probably get paint on your hands.
- Immediately start rotating the pot so that the paint floating on the water sticks to the painted surface.
- Continue to rotate until you either go all the way around the pot or there is no more paint on the surface of the water. Set the pot aside to dry. This will dry very quickly so you don't have to wait long!
How to Make a Stencil
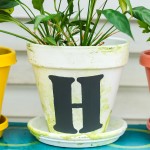
- You can get your stencil in a variety of ways. You can definitely purchase a stencil that you love from the store, however, making your own custom stencils is easy with a Cricut machine. I like using a self-adhesive stencil with a rounded surface like this one.
- Pick a font that you like for your design and add it to Cricut Design Space. I have my favorite monogram fonts here.
- Resize the letter to fit your clay pot.
- Cut the design with your Cricut machine out of stencil vinyl. NOTE: You can also use regular vinyl.
- That is it! You can have a custom stencil in minutes with a monogram letter or even a graphic design of your choice.
How to Paint Using a Stencil
- Now that you have your stencil cut, you will want to weed away any excess. In this case, you want to weed away any vinyl that is in areas you want to paint on your surface.
- Then just peel the vinyl back and stick to the surface of your painted pot. Be sure to press it down really well in all areas for best results. You can use transfer tape to help you move the stencil if the design is intricate.
- Then just paint the area inside of your stencil with a contrasting paint color. Remember to still use paint that is okay for outdoor use.
- For stenciling, I like using a pouncer brush and going over the area in light coats. Paint several light coats working from the outside of the stencil to the inside. This will help to prevent bleed under your stencil edges.
Sealing for Outdoor Use
- Once you are happy with the coverage of the paint in the stencil area, peel back the stencil and allow the pot to dry completely. Then you will want to seal the entire thing for outdoor use. You will want your easy painted clay pots to last as long as possible.
- Pick a sealer that is good for outdoor projects and follow the directions on the package. Usually you will need to do several coats for optimal coverage. This final step ensures your painted flower pots will last a long time so do not skip it!
Adding Plants to These Easy Painted Clay Pots
- All that is left to do is to add a plant inside of your project and enjoy them! You may also want to repeat this entire technique on a matching saucer for your pot. I feel like that completes the entire look and really make this one look great!