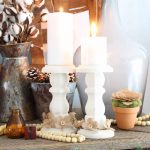
Wooden Candlesticks (Made From Table Legs)
Do you want to give your living space a unique and stylish look? If so, consider making wooden candlesticks from table legs. These DIY candlesticks are an attractive way to add warmth and charm to any room in the house. They can be used for both decorative and functional purposes, providing light and ambiance while also enhancing the overall decor of a space. With just a few simple materials, you can create beautiful wood candlesticks that will last for years to come!
Makes 2 candlesticks
What You Will Need
- Table legs from the home improvement store
- Wood circles from the craft store
- Wood glue
- Finish nails
- Drill
- Ruler
- Pencil
- Texture chalk paint from FolkArt
- Pouncer brush
Instructions
- Find the center of the circle to add the table leg. Draw on two lines that are the same length and touch the outer edges of the circle.
- Connect these two lines from end to end, as shown below. The center of that "X" is the center of your circle.
- Drill a hole large enough to accommodate the screw on the table leg in the center of your circle piece.
- Then, screw in your table leg. Add wood glue to the top of the table leg and add the other circle.
- Secure with finishing nails to hold everything together until the glue dries.
- Start by applying the paint with the pouncer brush in long strokes across the wood, making sure you get all the areas. Then, use a damp cloth to smooth out any brush strokes for an even finish.
- Once your DIY wooden candlesticks have completely dried, you're ready to light up your home with style.
Notes
- The chalk paint from FolkArt is perfect for those that want a rustic, worn, layered look to their projects in just one coat. You can sand it back to reveal part of the wood if you want.