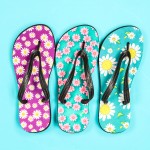
Sublimation Flip Flops
Today I’m going to teach you how to make your own customized sublimation flip flops! You can make flip flops in any pattern or style you want. I think they would make great party favors or gifts.I’m going to teach you how to make sublimation flip flops with an all-over print. You can use these same flip flops to create custom sandals with a single decal or monogram design.
Equipment
- Free Floral Patterns
- Sublimation Printer
- Sublimation Ink
- Heat Press
- Heat Resistant Gloves
- Tape Dispenser
- Needle Nose Pliers
What You Will Need
- Sublimation Flip Flops
- Sublimation Paper
- Lint Roller
- Heat Resistant Tape
- Protective Paper
Instructions
How to Make Sublimation Flip Flops
- To make sublimation flip flops we need to begin with a flip flop blank. I am using this set from Heat Transfer Warehouse and I really like them.
- When doing an all-over sublimation print I like to keep the flip flop in the form. If you were doing something like a monogram on the heel you may find it easier to take the flip flop out. I do think if you decide to press a small design you might want to try using an adhesive spray.
- Preheat for 10 seconds at 400 degrees and then allow to cool completely.
- When the flip flops are cool lint roll the entire surface to remove any lint, dust, or debris.
Apply the Sublimation Print
- For these flip flops, I am using two different sublimation prints. Depending on the size of your flip flops you will need at least an 8.5" x 14" sublimation print for each flip flop.
- I trimmed my sublimation print so it fits over one entire flip flop. I trimmed off the excess using scissors so I can use those pieces for smaller projects later.
- Using heat-resistant tape I secured the sublimation print over one entire flip flop. This is why I like to keep the flip flop in the form. The tape secures easily to the form, this is easier than trying to tape the print to the individual flip flops.
How to Prevent Sublimation Ink Overlap
- To keep the sublimation print from overlapping and creating a dark line I am adding heat-resistant tape over the edge of the sublimation print where the other print will overlap.
- Since sublimation ink won't go through heat-resistant tape the print overlapping won't impact the end result. Tape the second sublimation sheet into place. You don't need to worry about the tape overlapping onto the first sublimation sheet, you can tape the sheet right to it.
How to Press Sublimation Flip Flops
- Add a piece of protective paper to both the top and bottom of the flip flops. I like the 12 x 12 sheets of butcher paper but you can use any protective paper you have. Just make sure the entire blank is covered.
- Transfer the whole project to the press making sure everything is in place. If one of your flip flops falls out of the form you can add it back to the form and then press it.
- The pressing settings are 400 degrees for 60 seconds. Press for the full-time and then remove the entire thing from the press.
- Remove the protective paper and sublimation print to reveal your beautiful finished print.
How to Assemble Sublimation Flip Flops
- To begin you need to make sure you match the correct strap with each flip flop. On the bottom of each strap, you'll see an R or L, R for right and L for left.
- Insert the needle nose pliers as far into the toe hole as possible.
- Open the pliers as wide as you can and then grab the toe strap and pull it through the hole.
- If you can't pull it all the way through once it's at least half way through you can release it and then use the handle of the pliers to push it through the rest of the way from the top of the sandal.
- Once it's pushed through, use the pliers to make sure it's pulled all the way through and then flatten it out.
How to Add the Back of the Straps
- Once the toe strap is in place make sure you have everything laid out correctly. You don't want the straps to be twisted once you get everything in place.
- To finish the straps you'll pull the ends through the holes just like we did the toe hole.