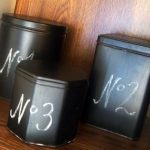
DIY Chalkboard Kitchen Canisters Set
This DIY kitchen canisters set brings an element of farmhouse charm into your kitchen, with a chalkboard twist to give it a modern, customizable feel! They can be used to store any number of items - from coffee and tea to sugar and cereal - or just as a pretty display. Whether you're going for a rustic vintage vibe or a modern farmhouse look, this handmade kitchen canister project is perfect for storage and adds a homey touch to any room.
What You Will Need
- Canister tins any size and type you like
- Metal primer
- Chalkboard paint
- Masking tape
- Plastic wrap
Instructions
- First, make sure your canisters are washed and cleaned. You can do this by using a damp cloth to wipe off any dust and dirt.
- Once they’re clean, let them dry for a few minutes, and then tape off the area that you will be painting (top part).
- Next, apply your metal primer. Be sure to spray paint with metal primer before the topcoat because primer helps the paint to stick well.
- Then, let it sit for about 15 to 20 minutes before you move on to the next step.
- Shake the paint can and then use a smooth, even stroke to apply the paint.
- Let each coat dry for about 15 minutes before applying another one.
- When the paint is dry, you can carefully remove the masking tape and plastic wrap.
Notes
- I put some masking tape around the tip-top of my tins and used plastic wrap to keep the paint out of the inside. I would think that if you paint all the way to the top the lid would scratch off the paint.
- You can buy chalkboard paint or try making your own. For today's project, I will be showing you how to paint these canisters with spray paint.
- You'll want to do multiple thin layers -- not one thick layer. This will help make sure that the finish is nice and even.