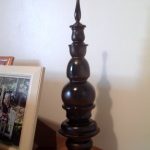
DIY Finials (Ballard Designs Knock-Off)
If you've been gazing with longing at the beautiful, ornate finials in the Ballard Designs catalog, this post is for you! You can create your very own version right at home! With some thrifty finds and a bit of strong glue, you'll be able to add a touch of elegance to your space with your DIY finials. It's time to roll up our sleeves and start this fun-filled, easy, and affordable project!
Makes 1 finial
What You Will Need
- Different-sized pieces variety of candle holders, small pots, or porcelain bowls
- E-6000 glue
- Spray paint color of your choice. I used brown, black and antique brass
Instructions
- Make sure to wipe down all of your base pieces with a damp cloth. This will help the glue adhere better, and the pieces remain firmly in place.
- Taking all of your base pieces, start to map out which pieces you would like to use and how they should fit together.
- Once you have everything in place, it's time to get gluing! Using the E-6000 glue, carefully adhere the pieces together. Make sure they are completely secure before setting them aside to dry.
- When the glue has set, take your spray paint and begin painting each piece - don't forget those hard-to-reach spots too.
- Once the paint has dried, you have a beautiful finial to add to your home. Try it out on a mantel or shelf to give your space an extra decorative touch.