How to Make Cricut Party Favors with Cricut Venture
Grab your supplies and make a huge batch of Cricut party favors with this quick and easy tutorial. Cut vinyl with your Cricut and apply to tins that you can then fill with anything you would like!
Equipment
- Cricut Venture Machine
- Weeding Tool
- Scraper
- Auto Cutoff Blade (optional)
What You Will Need
- Smart Vinyl (I'm using Silver)
- Transfer Tape
- Small Containers
Instructions
Decide on Design
- Design Space has thousands of images you can choose between or you can always upload your own.
- For my party favors I am using the Cricut Cutie images in Design Space. I need to make a lot of these party favors but the designs need to be less than 2 inches tall to fit on my container so I need to decide on my favorites.
- As you can see all of my designs are the same color. This will ensure all of the designs are cut out of the same material so they can all be cut out at once.
Cutting with Cricut Venture
- Just like with other Cricut machines click Make It in Design Space and then select Without a Mat since no mats are needed with Smart Vinyl.
- From here we want to adjust the quantity of each design we want to cut. I like to do this on the mat screen vs. duplicating the images on the canvas because I think it loads the designs easier this way.
- I need 125 total Cricut Cuties cut out so I'll adjust my quantity to 21 of each and then click Apply.
Preparing the Machine
- Now I can choose the material I'm using and I am also going to use the Auto Cutoff tool, so make sure that option is checked.
- The great thing about Design Space is if you follow the prompts on the screen it tells you exactly what you need to do to prepare your machine to cut your material.
- It also walks me through how to load my vinyl into the Venture machine.
How to Load Smart Vinyl into Cricut Venture
- First, we want to place the roll of vinyl in the roll holder. If you have the stand you can use the holder you see in the photo below. If you don't have the stand use the roll holder that comes with Venture.
- Raise the lever and move Pinch Roller to position 2. Then adjust the left and right guides to fit the material you're using. Lower the lever and then press the load button.
- Ensure you feed the material into the guides so it stays straight as it's cutting.
- Make sure you have both the Auto Cutoff Blade and Fine-point Blade loaded into the machine.
Cutting Party Favors with Cricut Venture
- After loading the material into the machine press the Go button to start the cutting process.
- Cricut Venture will cut all the designs very quickly. If you're using the Auto Cutoff tool make sure you open the basket on the stand so it can catch the material when it's cut.
How to Weed Cricut Smart Vinyl
- Once the cutting is complete use a weeding tool to remove all the excess vinyl. The weeding process is the same as you've done with other vinyl designs just on a larger scale.
- Once you have all the outside vinyl removed go back through and weed out the inside pieces.
How to Apply Cricut Vinyl to Party Favors
- I started by cutting the designs into strips and then cutting them into individual designs.
- Separate the weeded images and then apply the transfer tape to the design. Cricut Smart Vinyl calls for StandardGrip Transfer Tape.
- Apply the transfer tape to the vinyl and then use your scraper tool to burnish the vinyl both front and back to push the vinyl onto the transfer tape.
- Peel back the vinyl carrier sheet to leave the design on the transfer tape.
- Make sure the surface of your party favor is clean and prepped before adding the vinyl.
- When applying vinyl to surfaces I like to tack one corner of the transfer tape down to hold it in place.
- Make sure you have it placed right where you want it before pressing it down.
- Once you have the design in place press it down and then use a scraper tool or something else to burnish it down really well onto the surface.
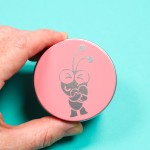
- Peel back the transfer tape to reveal your finished party favor!
- As always with permanent vinyl I recommend letting it sit for 72 hours before handling. This gives the adhesive plenty of time to adhere to the surface ensuring a lasting design.