Sublimation Mouse Pads
If you’ve ever struggled with making sublimation mouse pads my tips and tricks are sure to help you make the adjustments needed to get perfectly giftable mouse pads every time.
Equipment
- Free Watercolor Floral Designs
- Sublimation Printer
- Heat Resistant Gloves
- Tape Dispenser
- Dye Trans Pro Spray
- Heat Press
What You Will Need
- Protective Paper
- Lint Roller
- Sublimation Paper
- Sublimation Ink
- Heat Resistant Tape
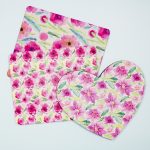
- Sublimation Mouse Pad (Heart, Black Back, Tan Back)
Instructions
How to Make a Sublimation Mouse Pad
- To make a sublimation mouse pad the first thing we need to do is preheat. Because I know this material holds a lot of moisture, I’m going to preheat it for a long time at the full temperature.
- These blanks call for a temperature of 385 degrees for 50 seconds.
- I am going to pre-press for the full 50 seconds and watch to see if I am still having steam from the mouse pad.
- If there is still steam, press again. Continue to press until you no longer see steam.
- Not only does this remove any moisture in your blank it will also preshrink it.
Apply Sublimation Print to Mouse Pad
- Now that we have the mouse pads preheated, they need to cool completely before adding the sublimation print.
- Once the mouse pad is cold, lint roll the entire surface to remove any dust, hair, or debris.
- Next, we need to add the sublimation print to the mouse pad.
- Rather than print my sublimation print to fit my blank I printed a full sheet of the design. I find this makes it easy to add the mouse pad and get the whole thing covered.
- Place the mouse pad onto the sublimation print white side down and tape the edges down really well. You do not want the sublimation print to move.
- Sometimes heat-resistant tape doesn’t stick to neoprene very well. If you are having a problem with the tape sticking, you can use a sublimation spray adhesive to hold the print in place.
Add Mouse Pad and Sublimation Print to Heat Press
- Add a piece of protective paper to the bottom of the heat press and then place the blank on top of the protective paper with the sublimation print up.
- Add a piece of protective paper to the top and then press.
- I am pressing for 50 seconds at 385 degrees. These call for light to medium pressure. Press for the entire time and when the time is up, remove the project from the heat.
- I found that neoprene can get very hot. I recommend using heat-resistant gloves to remove it from the press and the sublimation print.
- Once the sublimation print is removed your sublimation mouse pad is done.