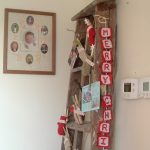
Glitter Christmas Banner
Christmas is just around the corner and I’m excited to share a fun way to display your Christmas cards. Along with the card display, I will show you how I created this fun glitter Christmas banner.
Equipment
- Red Burlap
- White Fabric
- Red Glitter Fabric Paint
- Paintbrush
- Twine
- Adhesive
What You Will Need
- Iron or EasyPress
Cricut Banner Options
- Cricut Machine
- Red Glitter Iron-on
- EasyPress
- Red Burlap
- White Fabric
- Twine
- Adhesive
Instructions
- Cut fabric to fit letters. You will want to measure how large you want your letters to be and compare that to how many letters you need. You will also need to measure the proper amount of twine.
- I used red glitter fabric paint and a paintbrush to paint the letters onto the white fabric scraps. If you choose to use your Cricut you can use any font you like. Since you’ll be using Iron-on make sure you mirror your image before cutting it.
- Next, we need to attach our white fabric pieces to the red burlap. I used glue dots for this step but you could also use fabric glue or even a hot glue gun.
- Once the letter pieces were all attached it was time to attach the letters to the twine. Measure out the twine to the length you want it to be and then space the letters onto the twine accordingly.
- When all is dry, your banner is ready to display.