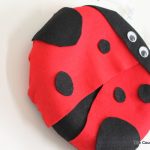
Lady Bug Wreath
Make this adorable Lady Bug Wreath! All you need are a few simple craft items to make this in ten minutes or less. A lady bug shaped wreath would be a fun addition to a kids room or your front door for the summer. Make this with the kids!
Equipment
- Paper plate
- Hot glue
- Felt fabric in black and red
- Large googly eyes
- White pipe cleaners
What You Will Need
- Wreath form by Styrofoam
Instructions
- To start, glue a paper plate in the center of the wreath form. This will add stability to the wreath and will make it easier to glue the felt on.
- Next, cut two half circles in red felt. These pieces will each be a wing of the lady bug. Then, cut a rectangle piece in black for the head. You will use the remainder of the black felt to place under the wings for separation and for the lady bug dots.
- Lay your felt pieces out on the wreath form before you begin hot glueing. Once you are happy with the arrangement, begin hot glueing each piece to the wreath form.
- After all of the pieces are glued down, flip the wreath form over and glue down on the back for extra stability. Then, cut away the excess with scissors.
- Next, cut a few circles out of the black felt for the lady bug spots, and glue them down in whatever pattern you choose.
- Next, wrap the pipe cleaners around pencil or narrow dowel rod to make the antennas curly. Then glue them to the back of the wreath so they poke up at the top.