Recycled Tin Can Herb Planter plus Printable Herb Markers
Make this herb planter from recycled tin cans in minutes. You can also print our free printable herb markers so you know which herb is planted where.
Equipment
- Tin cans in various sizes
- Popsicle sticks
- Bakers twine
What You Will Need
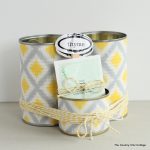
- Self adhesive fabric sheet You can also buy the Gray Matters Diamond Ikat Grey/White Fabric online and add adhesive to put it on your cans.
- Outdoor decoupage
- OL9815WX labels
- Free printable herb label file
- Americana spray seale
Instructions
- Start by adding some drainage holes to each tin can. Use any punch or sharp object to make your holes.
- Cut the fabric to size and remove the adhesive backing. Apply the fabric to can and smooth out any bubbles. If you cannot find adhesive fabric, use regular fabric and an adhesive or decoupage to put on the cans.
- Apply two coats of outdoor decoupage medium to the fabric to make it water tight and ready to be used as a planter. Allow to dry completely in between coats.
- While the cans are drying, you can print your herb labels and turn them into herb markers.
Make the Herb Markers
- Spray the sheets of labels with a couple of coats of Americana spray sealer. This will prevent the ink from running when you use the decoupage medium.
- Apply one label to the front of the popsicle stick and a blank one to the back.
- Apply the outdoor decoupage medium to the front, back, and sides of your herb marker to seal everything in.
- Wrap up the herb markers with seed packets of the same type of herb. Tie with baker’s twine.
- Tie up the cans you covered above with baker’s twine. Just wrap several times and pull really tight. Drop in your herb marker bundle from above.
- Your gift is ready to give!