DIY Planters for Succulents
Add a bit of life into your home with these DIY planters for succulents! They’re easy to make and come together in just minutes.
Makes 1 planter
Cost $10
Equipment
- Oven
- Clay tool kit
- Embossing folders Woodgrain and Honeycomb
What You Will Need
- 1 Nonstick craft sheet
- 2 blocks Polymer clay White and gold
- Artificial succulents
Instructions
- Start with the white clay. Work the clay between your hands for a few minutes to get it soft and ready to roll out.
- Roll flat with a roller or press with your hands. A roller will make the surface smoother. You can also press flat with your hands and then flip to reveal a smooth surface. If you notice air bubbles in your clay, you can use a sharp tool to poke a hole in those then roll again to flatten.
- Cut the clay into a rectangle and press it onto the embossing folder to get that pattern onto your clay. If needed, use a flat tool to remove the clay from the mat.
- Form the rectangle into a cylinder and seal where the edges join. Place on top of a separate piece of white clay that has been rolled flat.
- Work the bottom of the cylinder into the flat piece of clay. I like a tool with a rounded end to work these two together and make the joint look smooth.
- Cut around the bottom of your planter. Smooth the clay as desired with your fingers.
- Roll out a small amount of gold clay into a snake. This snake is then added to the top of the white pot to finish this one off.
- Before baking, be sure to poke holes in the bottom of the pot if you're using real succulents.
- Bake according to air dry package instructions.
Notes
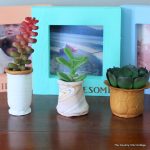
The gold planter, pictured on the far right, is made the same way without mixing two colors. Follow the steps above for this gold planter.
The middle planter, however, is a marbling process that needs different instructions! I used my leftover pieces of white and gold clay for this third pot.
To make marbled clay, roll both pieces flat and lay them on top of one another. Roll up and then flatten again. Cut that piece into strips and stack those strips on top of one another. Flatten one more time and you are left with a piece of marbled clay for any project.