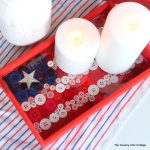
Button 4th of July Tray
This 4th of July Tray is the perfect patriotic craft for you to try this summer. It’s made with red, white, and blue buttons and an epoxy finish for lasting use. Don’t let the epoxy scare you – I’ve included step-by-step instructions!
Makes 1 Tray
Cost $25
Equipment
- Lighter
- Disposable mixing cups
- Stir Sticks
- Craft knife
- Hot glue gun
What You Will Need
- 1 Wooden serving tray
- Bright red paint
- Assorted red, white, and blue buttons
- Silver star sticker
- EasyCast clear epoxy
Instructions
- Paint your wood tray red with a few coats of paint and allow it to dry.
- Then, start laying out your buttons in a flag-like pattern. Get your pattern set before you start adding any glue.
- Lift each button, adding a small dab of hot glue. Glue into place and move to the next one. Repeat until you have a button flag at the bottom of your tray.
- Glue on the silver star to your button tray.
- You might also have a ton of hot glue strings on your project. Just use a hair dryer to remove those before continuing.
- Place wax paper under your tray. Mix and pour epoxy over the tray, following the instructions on the box.
- Wave a lighter over the surface being cautious not to actually touch the epoxy. As the bubble heats, it will pop and you will be left with a smooth surface.
- Use a craft stick to pop any bubbles around the edges. You will have to repeat this process several times during the first 30 minutes or so of drying time.
- Use a craft knife to cut away any excess epoxy that has seeped from the sides.