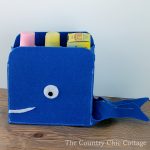
Sew Your Own Felt Storage Baskets
Did you know that you can sew your own felt storage baskets? You can even make them shaped like whales similar to what I did here. Y’all will love these for any new babies in your life or make a batch of these to organize a kids’ room or bathroom.
Equipment
- Black Dimensional Fabric Paint
- Fabric glue
- Marker
- Scissors & Thread
- Sewing machine
What You Will Need
- 9×12 Stiff Felt Sheets in Royal Blue three sheets for the large whale and two sheets for the small (the stiff felt is important so your containers stand up!)
- White Felt
Instructions
The Larger Version
- Begin by cutting a whale like shape out of the felt as shown below. You will need two identical shapes for the large container.
- Over lap the two halves slightly and sew with a zig zag stitch down the center. I used white thread on the entire project because I liked the look but you can choose to match the thread to the felt.
- Cut a strip of felt about 5 1/2 inches wide. You can vary this width depending on what you will be storing in the whale. Sew that on the “front” side of your whale as shown below. Center over the line you just sewed in the previous step.
- Lift the sides and sew up each side. Note how I left this piece long until I was finished sewing.
- Trim off the top with your scissors to the desired height.
- Next sew down the bottom of your whale on both sides. Stop approximately where the “back” will be.
- When sewing on the back piece it is important to sew down both sides FIRST! (Ask me how I know that is important….one experimental whale had to go in the trash.) Then trim to length at the top if needed.
- Now you can sew across the bottom
- Take the ends of the tail and sew those together as well.
- For the eyes and mouth, cut pieces from the white felt. Apply the dimensional fabric paint to your eyes as shown below. Set aside and allow to dry completely.
- Use the fabric glue to add a mouth and eye on both sides of your felt storage baskets. You now have learned how to sew your own felt storage baskets!
The Smaller Version
- For the smaller version of the whale, fold one sheet of felt long ways as shown below. Make the “bottom” as wide as you want your storage container.
- Then draw on your whale shape and cut out of both “sides”.
- Sew similarly to the way you did for the large version above. Be sure to still sew down both sides even though it is just folded on those lines.
- Again, glue on eyes, your mouth pieces, and sew the tail at the end.