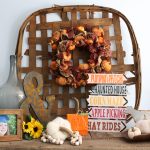
Halloween Wood Sign
Make a spooky Halloween wood sign with your Cricut and Testors Craft paint!
Equipment
What You Will Need
- Wood sign
- Testors craft paint in a variety of colors
- Vinyl in any color
- Cricut cut file
- Paintbrushes
- Transfer tape
- Weeding tools optional
Instructions
- Start by deciding which slats will get which color of paint. I wrote down my plan of which color and which saying I would put on each slat so I didn't lose track on a piece of paper. Paint your sign with one coat of Testors craft paint - that's the only coat you'll need.
- Paint the front and sides of all slats. If you plan to display this sign outdoors, be sure to flip it over and paint the back once the front is dry.
- I also went back in with a darker brown and painted where the back slats show through to the front for more of a finished appearance.
- Set your sign aside to dry and, in the meantime, you can cut the vinyl for your stencils. The vinyl color does not matter because it's only a stencil.Weed away all excess vinyl on each piece. That includes the outer edge as well as the centers of any letters.
- Once your pieces have been weeded, use transfer tape to add them to your dry sign. Apply it to the front of your vinyl and press down firmly.You only need to use one piece of transfer paper for the entire sign.
- Remove the backing paper from the vinyl. Your pieces should stick to the transfer tape.
- Apply your vinyl stencil to one of the slats. Press down firmly.Peel back your transfer tape. Your vinyl stencil will remain on your Halloween wood sign.Press down one more time - just to be sure!
- Paint over the top of your slats (with the stencils in place) with white paint. You want to use a really dry brush with not much paint on it.You only want to use a VERY light coat of white paint here.
- Do this same technique to every slat on your sign.
- Right away, start pulling off the vinyl letters. I find that a weeding tool helps with this.Continue until you remove all the letters on your sign.
- After everything dries, go back in and add your arrows. Use a dry brush with black paint to create rustic-looking arrows.Allow those to dry and your Halloween wood sign is complete!