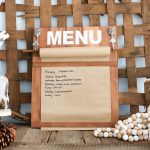
DIY Menu Board with Farmhouse Style
Make your own farmhouse style menu board in minutes with these instructions.
Makes 1
Equipment
- saw
- Screwdriver
- Paintbrush
- Rag
What You Will Need
- 14 inch Kraft Paper Roll
- Wood Stain
- Arrow Hook 2 required
- 1/2 inch Dowel Rod at least 17 inches long
- 1 inch Basswood Strips 2 required
- Screws
- Wood Glue
- White Vinyl
- Transfer Tape
- Cricut cut file
Instructions
- You will want to start by staining all of your wood pieces. You can use a wood stain in the color of your choice. Brush on the stain, allow it to sit a few minutes, then wipe away the excess with a rag. Do the same thing with the sign, dowel, and wood strips.
- Then you will need to measure and mark the dowel and wood strips to size and cut them with a saw. Your dowel and two wood strips need to be almost the width of your wood panel. Cut four small wood pieces from the strips to raise the strips off of the board. Stain these pieces and allow them to dry.
- Once your stain has dried, you can start assembling your DIY menu board. Add the arrow hooks to the top of your board with screws.
- Layout the remaining pieces onto your wood panel. Place a short wood piece under each end of your long wood strips. Secure everything into place with wood glue. Weigh down the joints while they dry.
- In the meantime, you will want to add the word "MENU" to the top of your board. Open up the cut file and use your Cricut to cut the word from vinyl.Weed away all of the excess vinyl including the centers of the letters.Then use transfer tape to remove the vinyl from the backing paper and add to the wood panel.
- Then add your kraft paper roll to the dowel and put it on the hooks.