How to Make a Paper Plate Kite
This kid-friendly kite craft is the perfect summer activity! With just a few supplies (that you probably already have laying around), you can make ready-to-fly paper plate kite for endless summer fun.
What You Will Need
- Paper plates
- Markers
- Scissors
- Hole punch
- Kite string
- Yarn (or other string)
- Fabric scraps
- Craft sticks (popcicle sticks)
Instructions
Step 1: Create the Body of Your Kite
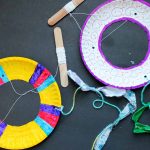
- Start by tracing anything round in the center of your paper plate and cutting out a hole with scissors. Older children can definitely do this step themselves but younger ones might need a bit of help.
- Get out your hole punch and add some holes to the plate.
Step 2: Color Your Paper Plate Kite!
- Now you can let the kids loose with the markers. Let them decorate their kites in any way that they want. Decorate one or both sides....this part is completely up to their imagination. After they are happy with their kite craft, add a long piece of yarn to the punched hole that is close to the outer edge. Tie on pieces of scrap fabric to make a fun kite tail. Any extra yarn and fabric will work for this part of the kite.
Step 3: Attach Your Kite String
- Next you need to make it a kite! Add some kite string through the two remaining holes as shown below and tie.
- Unwind a long piece of string and cut. Then wrap around a craft stick. This will keep your string neat and give the kids something to hold onto when flying the kite. NOTE: Tie the very end of your kite string to the craft stick to prevent the kite from blowing away in heavy winds.
Step 4: Time to Fly Your Paper Plate Kite!
- Head out and give your new kite a test drive! This kite craft is fun for kids of all ages.