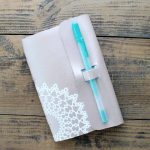
How to Make a DIY Leather Notebook with Your Cricut Maker
This homemade leather notebook is a great keepsake, or can be a wonderful, thoughtful gift for friends or family!
Equipment
- Knife Blade
- Scoring Wheel
- Weeding tools (optional)
- Cricut EasyPress
What You Will Need
- Cricut Metallic Leather (in the color of your choice)
- Foil Posterboard (in the color of your choice)
- White cardstock (12x24 sheets offer better material utilization)
- Everyday Iron-on in white
- Parchment Paper
- Craft knife
- Needle
- Thread
- Scissors
- Quick dry adhesive
- Cricut Cut File
Instructions
Cutting the Leather Pieces for Your Notebook
- Start by cutting out all of your pieces from this cut file.
Applying the Iron-On
- We can now start to make our leather notebook. Start by applying the iron-on to the outside of your leather piece. A few tips here:
- Use the EasyPress for maximum success.
- Put the weeded piece of iron-on directly on the leather with the carrier sheet still attached.
- Cover the entire thing with parchment paper to protect your surface.
- Follow the official Cricut EasyPress guidelines for time and temperature.
- Remove the carrier sheet while still warm.
Folding Your Pieces
- Now, you can fold all of your paper pieces on those score lines you created in the Cricut Maker. The scoring wheel allows you to make perfect, effortless folds. Your white card stock should be placed in three stacks of three. Then fold the foil poster board in on both of the score lines as it is what will line your leather piece.
Assembling the Project
- Then, use a quick dry adhesive to put the foil poster board inside of your notebook as shown below. Line up the folds with the small slits in the leather.
- Once dry, use a craft knife to transfer those cut slits to the foil piece.
- You will also want to mark each piece of card stock along the fold exactly where the slits will end up once assembled. Then use a needle to poke a hole in these locations. This will make sewing a bit easier later.
- Then use a needle and thread to sew up your journal. Start with your knot on the inside, go through the three sheets of card stock, then through the foil and leather. You will then go up through the next slit in the leather and foil then through the next set of holes in the card stock. Repeat for all four slit locations.
- Continue through each of the three sets of three until all of your paper has been sewn into the leather notebook.
- Knot off your thread and you have completed your project! But how do you keep your new leather journal closed? Well that is easy!
- Just pull up on the loop you created in the leather and then pull it through the rectangular hole. Add a pen and this is one cute DIY leather journal!