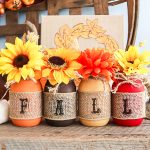
How to Make Fall Mason Jars
These fall jar crafts are so easy to make and you will love the way they look in your home.
What You Will Need
- Pint mason jars
- Burlap ribbon
- Chalk paint
- Paintbrush
- Scissors
- Twine
- Hot glue and a glue gun
- Letter stencil
- Stencil brush
- Flowers
Instructions
- Paint each of the mason jars. Be sure to clean them well before painting. I like to use rubbing alcohol on the surface and allow it to dry before painting. Paint as many jars as you need for this project in whatever colors you like. I love chalk paint for this as one coat does the job!
- While your jars are drying, cut your burlap ribbon to 11 1/2 inch lengths. You will need as many ribbons as letters in your design.
- Stencil each ribbon with the letter of your choice. Be sure to protect your work surface and use a stencil brush for the best results. I am using a two layer stencil but you can choose a simpler letter if you would like. You can also use HTV and your Cricut machine for this step instead.
- Once your ribbon and jars are dry, wrap each jar with one ribbon and hot glue in the back to secure into place.
- Wrap twine around the top of each jar and tie in a knot. I also like to fray the ends of my twine but this is optional.
- Add flowers to complete your fall mason jars.