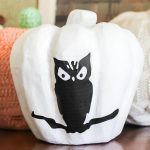
How To Make An Owl Pumpkin For Your Home
Are you ready to create a unique Halloween decoration that will have all the neighborhood kids hooting in delight? Let's introduce you to our fun and whimsical project: The Owl Pumpkin! Creating an Owl Pumpkin is a delightful way to add some charm to your Halloween decor. Made from paper mache pumpkins, this funky owl will give a creative twist to the traditional pumpkin silhouette.
What You Will Need
- Paper mache pumpkin
- White paint
- Mod Podge
- Owl silhouette printed on paper you can find your own image or try the free images here, here, and here
- Scissors
- Paintbrush
- Craft knife optional
Instructions
- First, paint your paper mache pumpkin with white paint. Allow the paint to dry completely before moving on to the next step.
- Next, print out the owl silhouette of your choice and cut it out with scissors. If you'd like a more intricate look for your owl, use a craft knife for the details.
- Apply Mod Podge to the back of your owl silhouette and attach it to your painted pumpkin. Be sure to press firmly so that it sticks securely.
Notes
- I did get a few wrinkles due to the fact that the surface itself is bumpy, but overall, it turned out great!
- I did not put any Mod Podge over the top of the image. I was afraid of the ink running once the paper got wet with the Mod Podge.
- In order to decoupage on the top, you would need to seal the ink. I usually use hair spray over the top of my image before starting if I am going to decoupage the front. This will ensure that the ink does not get wet and run.