DIY Magnetic Knife Block
Organize your kitchen in style with this DIY magnetic knife block! In just a few simple steps, you can create a fun, decorative knife block for a fraction of the cost of a store-bought version.
What You Will Need
- Unfinished wood panel
- Wood finishing cloths
- Stencil of your choice
- Craft paint
- Varnish
- Stencil adhesive
- Painter's Tape
- Paint brush
- Heavy duty magnets
- Permanent adhesive
Instructions
Step 1: Stain the Wood Blox with Your Favorite Wood Stain
- Start by staining your panel with the wood finishing cloths. Wipe away any excess stain and allow to dry completely. Then apply the stencil adhesive to the back of the stencil. Be sure to follow all instructions on the back of the brand that you purchase.
Step 2: Add a Pattern to the Magnetic Knife Block
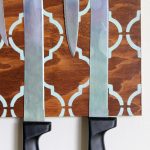
- Add painter's tape around the edges of the panel.
- Press the stencil into place on the front of the wood panel. Use a paint brush to apply the craft paint to the stencil.
- Remove the stencil and tape then allow the paint to dry completely. Apply a couple of coats of varnish over the top of your project. This will protect your painting from scratches when you add your knives and the environment in your kitchen.
Step 3: Attach the Magnets for Your Magnetic Knife Block
- Make sure everything is dry then start adding magnets to the back of the project. Use a strong adhesive to apply heavy-duty magnets to the inside of your panel. When applying the magnets, experiment with which end of the magnet will attract and which will repel. You will want to lay the magnets in such a way that they are attracting each other. Hold the adjoining magnets as you apply each one. This will keep them from lifting from your surface.
- I used 70 magnets on my project. You need to fill the panel to get the knives to stay in place. Allow the adhesive to dry completely.
Step 4: Mount Your Magnetic Knife Block in Your Kitchen
- Once dry, your project is ready to hang in the kitchen! Be sure to hang this one out of the reach of any children. We don't want anyone getting hurt!