Halloween Witch Legs: Door Wreath Idea
Make these fun and colorful Halloween witch legs--a unige Halloween door decor idea!
What You Will Need
- Testors Paint in black, green, white, and fuchsia
- Cricut Cutting Machine
- Witch legs file
- Purple tulle
- Various ribbons
- Paint brush
- Tacky glue
- Hot glue and glue gun
- Baker's twine
- Scissors
- Ruler
- Pouncer brush
Instructions
- Start by cutting five of the witch legs from some chipboard. You can click here to access the file and cut them with your Cricut. NOTE: Thicker chipboard would require less pieces.
- Use tacky glue between the layers and glue them together into a stack.
- Allow to dry. TIP: Use a heavy object or book to weigh them down while drying.
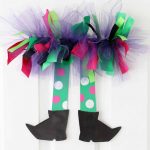
- Once dry, use Testors paint to paint your legs and shoes as shown below. Be sure to paint your edges for a finished appearance. TIP: This paint comes in metallic and matte sheen. Mix it up to really make your project stand out!
- Add a base layer of black and green, allow to dry, then use a pouncer brush to make polka dots on the legs in contrasting colors.
- Then allow everything to dry completely.
- Cut tulle and ribbon into 8 inch strips.
- Tie each strip in a knot in the center then use hot glue to secure that knot to the band across the top.
- Continue until the top is as full as you would like it.
- Then flip your project over and add some baker's twine with some hot glue for a hanger.
- Your witch legs are complete and ready to hang on your door or anywhere else in your home.