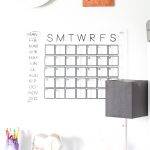
DIY Acrylic Calendar
Make a calendar with your Cricut machine to organize your home or office!
What You Will Need
- Plexiglass sheet I used an 18" x 24"
- Cricut machine (or another electronic craft cutter)
- Black vinyl (or another color of your choice)
- Weeding tool
- Transfer tape
- Drill and drill bit
- Ruler
- Metal spacers (optional)
- Screws
- Metal washers (optional)
- Dry erase markers
- Calendar image file (see above for how to download for free)
Instructions
- You will need to start by cutting the vinyl with the calendar image. I am going to give you instructions on how to do so with your Cricut below. Before you get started, download the calendar image using the form above. An email will be sent with instructions for downloading to your computer.
- Once you upload the SVG you will want to size it to fit the plexiglass piece that you are using. If the size you want is larger than the mat you have, you will need to break it up into sections. Then cut your pieces from vinyl using your Cricut machine.
- Now it is time to put that vinyl onto your plexiglass surface.
- Remove excess around cut vinyl. Use your weeding tool as needed. Be sure to remove centers of letters.
- Apply transfer tape to pieces and lift off.
- Splice the pieces of your calendar together by joining the pieces of transfer tape.
- Remove protective film from plexiglass.
- Apply vinyl to piece.
- Press firmly then slowly remove transfer tape.
- Remove protective film from back of plexiglass.
- Measure and mark for four holes in the corners.
- Use a drill and drill bit to slowly drill the holes.