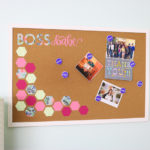
DIY Cork Board
Making a DIY cork board has never been easier! Did you know that Cricut iron-on works great on cork? You can customize your own DIY framed cork board in minutes with this technique.
Makes 1 board
What You Will Need
- Cricut Explore Air 2 Wild Rose Bundle
- Cork board
- Cricut EasyPress 2 Rose Bundle
- Natalie Malan Patterned Iron-on in Belle Citron
- White paint
- Paintbrush
- Cricut vinyl in two colors
- Cricut Iron-on in the color of your choice
- Transfer tape
- Cricut scraper
- Weeding tools
- Small wood discs
- Thumbtacks
- Hot glue and a glue gun
- Cricut Iron-on Protective Sheet or parchment paper
- Cricut cut file
- Scissors
Instructions
Step 1: Paint Your Pieces
- Start by painting the frame of your cork board. Use a scrap piece of paper to mask off the cork while painting.
- Paint all the way around the outside. You may need a couple of coats of paint. Just be sure to allow it to dry in between coats and completely before continuing with your DIY cork board.
- Paint the wood discs that you will use for your custom thumbtacks. Paint both the top and sides. I did not paint the back as it will be against the cork board when in use.
- Again, these may require two coats of paint so be sure to allow them to dry in between coats. You will want these to dry completely before adding any vinyl.
Step 2: Cut the Vinyl and Iron-on with Your Cricut
- Using the cut file in the post above, cut the pieces on your Cricut machine.
- Cut the thumbtack pieces from vinyl in two colors. You will want to be sure to resize these pieces to fit the wood discs you are using before cutting.
- Then cut the pieces for the DIY cork board from heat transfer vinyl. Remember to mirror these before cutting and place the iron-on shiny side down on your mat.
Step 3: Clean up the excess
- Once everything has been cut, you will want to use weeding tools to weed away all excess.
- Weed around the outside of your designs as well as the centers of any letters.
- Now, move on to creating your own custom thumbtacks.
How to Make Custom Thumbtacks
- Now it is time to pull everything together. We are going to start with the custom thumbtacks with inspirational words.
- Place a vinyl circle on top of the painted wood discs.
- Then use transfer tape to add the words to each one.
- Use hot glue to add a thumbtack to the back of each disc.
- Continue until you have a bunch of custom thumbtacks for your DIY cork board.
Adding Heat Transfer Vinyl to Cork
- Now it is time to do some cork board DIY decorating. Once your iron-on has been weeded, trim the carrier sheet as close as possible to your design with some scissors. Then lay out your pieces on your cork board.
- You will need the Cricut EasyPress to add these pieces to your cork board. Look up the time and temperature on the Cricut Interactive Guide for cork. Set the time and temperature on your EasyPress and allow it to heat up until it beeps.
- You will need to protect the cork surface from the heat of the EasyPress as well. You can use the Cricut Iron-on Protective Sheet or some parchment paper for this.
- Lay the protective covering over your iron-on and cork board then put your EasyPress on top. Hit the “C” button to start the countdown timer. Press down with firm pressure on the handle. Once your time is complete, move the EasyPress to the next area. It is okay to overlap areas during your presses.
- Once you have pressed all areas, check to see if the iron-on has completely adhered. If it hasn’t, then just repeat the pressing process. Continue this until you can remove the carrier sheets from your designs.
- Once all of your iron-on is stuck and your carrier sheets have been removed, your DIY cork board is complete and ready to hang on the wall.
- Be sure to add your custom thumbtacks to complete this DIY framed cork board.