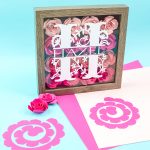
Paper Flower Shadowbox
This DIY shadowbox is perfect with paper flowers made on your Cricut machine.
Makes 1
What You Will Need
- Cricut machine
- Paper in various colors
- Shadowbox
- Hot glue gun
- Vinyl
- Transfer tape
- Light grip mat
- Weeding tool
- Scraper
- Tape
Instructions
Designing Flowers in Cricut Design Space
- Let's take a look in Cricut Design Space at designing the project. You'll need a flower as well as a monogram for the vinyl on the front, or any kind of design on the front. For the flower, I’m using spiral flowers and I'm going to show you how to make those, but let's talk about how to find them in Cricut Design Space first.
- Go to “image” and we're going to search for a flower. We're going to pull down “project type” and we're going to click “3D”. This filters them down a little bit. You’ll start to see spiral-like flowers. You can click “view image sets”, and that will show you what image set that the flower is in.
- If you open that image set, you will see more variations, most likely of the flower that you're looking at. I could choose pointy leaves or just plain spirals. From there, you should be able to find a flower that you like for your shadow box.
- I have inserted a version of the flower and all I did was just play with the size until four would fit on a sheet. Four on the sheet will help me utilize my material the best. I just cut four on a sheet and made some samples, and those fit really well inside the shadow box that I'm using. The dimensions of my flower are 4.911 by 5.181. Now, when I click “make it”, I can make four copies. Click “apply”. If I scroll down to my flowers, you can see that four will fit on a sheet.
Making a Split Monogram in Design Space
- Now, let's talk about making the monogram for the front. You could do a monogram, quote, or just a cut design - whatever you want for the front. I'm going to do a monogram. I searched "H monogram" in Cricut Design Space and added my name in a font that I liked in the middle. My font is a classic Roman Standard Regular. I added my font to the center of my monogram. I sized it to about 6 x 6 inches. Be sure to attach the two pieces together, so they will cut from one piece of vinyl. Now let's head to our machine!
Cutting Flowers
- First, I added my paper to my mat and I set my material to “medium cardstock” in Cricut Design Space.
- We can now add our mat to the machine, and I have my fine point blade installed. We'll press the “go” button to start cutting.
- Once the cut is complete, remove the mat from the machine then remove the flowers from the mat. For the flowers, I'd recommend turning the mat over and peeling the mat back to remove each of the flower pieces.
How to Make Paper Flowers
- There are a variety of ways to assemble your flowers. I use my hot glue gun for my flowers, but you can use other forms of adhesive as well. Start from the outside edge and roll to the inside and use the middle portion - it’s like a circle for the glue. I'm using four rows of four flowers, and I need 16 of these flowers.
Special Tools for Making Cricut Flowers
- You can use a variety of tools to help you roll the flowers. Most commonly, people use a quilling tool. A quilling tool would be an extra expense if you do not have one. If you're just making one shadow box for yourself, I recommend not buying a quilling tool. If you're going to make these shadow boxes to sell, a quilling tool will make your life a lot easier.
- I'm just going to make one shadow box for myself, so I’m just going to use my hands, however, there are a couple of tools that you can try and see if you like them. One of those is just a sharp pair of pliers, and another would be tweezers. You can try those to hold that center piece as you roll your flower.
Making Rolled Paper Flowers
- I like to just use my hands. Start from the outer edge and roll as tight as you can get it.
- Once I have it as tight as I can get it, I just sort of release my fingers slightly and let it expand until I like the look. In nature, flowers would be partially open, partially closed. There would be a variety of different looks. I just let it open as far as I want it to open.
- Then hold it in place and fold the circle piece down slightly. Add glue to that circle.
- Fold the circle back down and hold it into place while it cools. The glue secures all of the layers of the flower. As I'm holding it and letting the glue cool, I work the outside petals and bend them slightly to make them look like they are open a little bit. I basically do it until I like the look of the flower itself. Now my flowers are complete!
Assembly of the Paper Flower Shadowbox
- I cut some navy blue paper to size to use as a background. You can use adhesive to secure to the back of your paper flower shadowbox.
- Take the shadowbox apart and take out the insert if yours has one. My flowers will need to fit inside of the insert as that will take up some room inside of the shadowbox. I want my flowers to go in a certain order, color-wise. You could do this randomly, all the same color - just totally depends on what you would like to do. Add that insert around the outside and use it to help place the flowers.
- Then glue the flowers individually to the navy paper. Be sure to clean up any glue strings before assembling the shadowbox. You will also want to make sure that your glass is clean on the inside. Add that insert back in then put the backer with the flowers attached inside. The flowers make this one pretty tight, so we'll just kind of squeeze it down and fold the frame tabs slightly down all the way around. And there you have it, your flowers are in the shadowbox!
Adding Vinyl
- Now we're going to add our monogram that I cut out of vinyl to the paper flower shadowbox. Be sure to clean any debris from the front. Cut and weed your vinyl then put it on some transfer tape. Because my design is pretty large, I'm going to use the hinge method of application. I'm just going to run a piece of tape down the center and add to the front of the shadowbox. Make sure it is burnished down really well on both the front as well as the back before doing this.
- Then just remove one side from the backing paper. This method of vinyl transfer makes it a bit easier because you don't have to deal with so much at one time. Cut away the backing paper from the portion you peeled back.
- Then apply that half of the vinyl from the center out. This also helps with bubbles because you're just working with half and you can really work from one side to the other.
- Once you have that half stuck, remove the tape. Remove the backing sheet from the other half.
- Once again, work that down from the center out. Go slowly and burnish well to help remove any bubbles. All that's left to do is peel back that transfer tape, burnish down your vinyl one more time, and this one is ready to display in your home or give as a gift!