Cricut Sublimation with WalaSub Sheets
These sublimation sheets are perfect for those that don't have a sublimation printer but want to try the craft!
What You Will Need
- WalaSub Sublimation Sheets choose option that comes with Siser EasyMask
- Cricut Machine any Cricut machine will cut these
- Weeding Hook or Tweezers
- Light Grip Mat
- Heat Resistant Tape
- Artesprix Protective Paper
- Pressing Pillow
- EasyPress or Heat Press
- Lint Roller
- Scraper
- Scissors or Paper Trimmer
- Shirt must have at least 65% polyester content in order to work with sublimation
- Born to Craft Design
Instructions
Adding Mask
- First, flip the sheet over to the back. You want it to be ink-side down on the table. Apply the Siser Easy Mask to the back of the WalaSub sub sheet. I find it is easiest to start applying it on one side. Then press it with the scraper to remove any bubbles from your application while keeping it as straight as possible.
- Once you've applied the mask to the back, trim away all the excess white around the outside edge as well as any excess masking off the edges. You can trim that either with a paper cutter or a pair of scissors. The WalaSub sublimation sheets are about 11 x 12 inches once you trim off the white area around the outer edge. I ended up with an 11 x 11.5 inch sheet as I did trim a bit extra.
Putting on the Cricut Mat
- Then put the sheets on the Cricut mat with the ink-side up and mask-side down. Press it down well on your mat to prepare for cutting.
Cutting on a Cricut
- Be sure to mirror the cut in Cricut Design Space. I'm using “everyday iron-on” as my setting and the fine point blade is loaded into my machine. You do want a kiss cut on this product so you want the ink side to be cut but the mask to stay in one piece. Then just let your machine cut the design from the sheet. Once it's done cutting, just remove the mat from the machine. Peel back the mat from the material before weeding the sheet.
Weeding WalaSub Sheets
- Once you remove the sheet from the mat, you can cut away any excess to use on another project. Then start removing all excess with your hands. I would recommend doing this with your hands if you can, and not using weeding tools.
- After you remove everything from the outside, start peeling off the centers of any letters or designs. For super small details, you might have to use a pair of tweezers or a weeding hook to dig those out. Just be careful not to scratch the ink on the design itself.
Pressing on a Shirt
- I went ahead and added a pressing pillow as well as a piece of protective paper to the inside of my shirt. The pressing pillow helps eliminate any press marks that can get on your polyester shirts. This is a 95% polyester shirt. Remember you do need something with a polyester coating in order for the Cricut sublimation sheets to react.
- I went ahead and pre-pressed the shirt for a few seconds and lint rolled over the top to remove any debris.
- Then just add your design ink-side down onto your shirt. The Siser Easy Mask is sticky so it should hold it into place. If you feel like it's going to move, go ahead and add some heat tape in order to keep it from moving in your press.
- Cover it with a sheet of protective paper and press at 400 degrees for 60 seconds. You do want medium to heavy pressure. The Cricut Easy Press should work as long as you press down as it's heating.
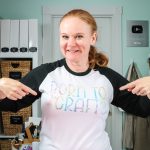
Cricut Sublimation Results
- After pressing, you can remove the sheet while it's still hot. Just peel back the masking and remove everything from your shirt. Then admire your gorgeous design all with WalaSub sublimation sheets.