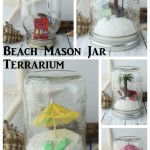
Beach Mason Jar Terrariums
There are a ton of mason jar snow globes out there but I thought I would put a summer spin on the idea. These beach mason jar terrariums are a fun-in-the-sun addition to your home decor!
Equipment
- Decoupage medium
- Glue gun
- Hot glue
What You Will Need
- Mason Jar (I used wide mouth pints and regular mouth quarts) (look for ones with smooth sides to make it easier to see inside)
- Sand
- Clay or Styrofoam Balls (See two different methods)
- Various Miniatures Use miniatures of your choice, but I have a few suggested below.
- Diorama Palm Trees If desired
- Drink Umbrellas If desired
Instructions
- I am going to start with the first of two methods for making these beach terrariums.
Method One: Air Dry Clay
- Start with air dry clay and sand for the first method. Spread the clay out onto the mason jar lid as shown below and allow it to air dry.NOTE: Add hot glue to the bottom of the clay piece if it wants to lift off of the mason jar lid.
- Next, cover the clay with a decoupage medium and adhere white sand to the surface. Allow it to dry completely before continuing.
- Add a variety of miniatures to your sand using hot glue. Sometimes you have to stick the miniatures with hot glue a few times as they do not want to stick to the sand. However, I did manage to get everything to work after a few tries.
Method Two: Syrofoam
- If you want a higher surface or multi-level look inside your beach mason jar, the Styrofoam ball is the way to go. You can cut it in half and adhere it to the mason jar as shown below. This will give a "hill" or sand dune type appearance inside your jar.
- You can also cut a bit off of the top and bottom of the ball to make a flatter raised surface. I just used a serrated knife to cut the Styrofoam. Just adhere either one to the mason jar lid with hot glue, cover with decoupage medium, and add sand just as you did with the clay.
- Allow the entire thing to dry before adding your miniatures/decorations.