Make Your Own Fridge Magnets with a Cricut
Did you know that you can make your own fridge magnets with a Cricut? Well, you can and they make an amazing personalized gift for any toddlers or preschoolers on your gift-giving list. Make them their own name spelled out in fun felt letters and they can play at the refrigerator all day!
What You Will Need
- Cricut Explore Air 2
- Cricut Felt
- Magnets
- Cricut Mosaic Iron-on
- Cricut EasyPress
- EasyPress Mat
- Embroidery Thread
- Needle
- Hot glue and a glue gun
- Stuffing
- Cricut cut file you will need to personalize with your name but the font is in this file
Instructions
- Start by personalizing your cut file with your name. Change and duplicate the letters as needed. Remember that for each letter you will need two felt pieces and an iron-on piece. Then, cut the pieces with your Cricut Explore Air 2.
- Use a brayer to press the felt down well on the mat when cutting. Then cut two of each letter (both a front and a back.)
Cut the Mosaic Iron-On
- Put the material face-down on the mat and mirror the image before cutting. In this case, the “back” is the side where you can feel the squares and should be up when cutting.
- Then mirror your design and cut one each of the letters to make your own fridge magnets. Be sure to turn your dial to custom and pick mosaic iron-on from the list as this is different from other types.
Weeding Mosaic Iron-On
- Then you will want to weed away the excess around your iron-on pieces. This material actually has a double liner for easier weeding.
- Instead of peeling away each and every one of those squares, just separate the two liners. Then pull away the excess around the entire thing using the first liner.
Putting Mosaic Iron-on on Felt
- Your top felt letter should have the iron-on added to the front. For each letter, preheat the felt for a few seconds before starting. You will want to preheat your EasyPress to the time and temperature recommended on the heat guide. Then, add the iron-on to the letter aligning with the sides. Press for the recommended time and temperature.
- Then you will peel back the double liner. Start by pulling up the first liner. The second may stick to this one and that is okay! Either peel just the first or both of them at the same time. Then peel away the second liner if needed.
- Repeat for all of the letters. Remember you only need one of each with the iron-on applied.
- Add the magnets to the back of the front letter with a little hot glue. Allow to cool before continuing.
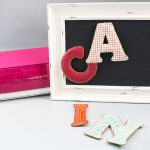
Sewing the Felt Letters
- Now it is time to sew each letter. If the letter has an inside portion like the “A”, then sew around the inside first. Otherwise, just start around the outer edge sewing by hand. I am using a contrasting embroidery thread for each letter.
- Sew a few inches then stuff. Sew a few more inches and stuff again. Add just a little bit of stuffing to make the letters slightly puffy. Stuffing gradually as you sew makes the process much easier.
- Repeat for all of your letters.