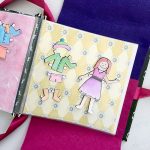
DIY Paper Doll Activity Set
Make your own cute take-along paper doll purse to carry all those cute paper dolls. This DIY paper doll activity set makes a great handmade gift that can be personalized and added to easily.
Makes 1 book
What You Will Need
- Small photo album with photo pages
- Ribbon
- Felt
- Glue I used hot glue, craft glue would work too
- Velcro
- Scissors
Instructions
- Cut and glue felt piece on the inside back of the book. The felt should be big enough to fold over a page. This helps prevent the paper doll pieces from falling out of the different photo pockets. I used two pieces of felt so one folds up and one folds down. This provides even more play space when fully opened.
- Starting inside of the front book cover, attach the end of the ribbon to the inside of the book cover with a dot of glue. Then, wrap the ribbon around the outside of the photo album with excess ribbon.
- Attach a piece of velcro to the end of the excess ribbon as a "clasp" to keep the book closed.
- Do not glue the ribbon completely down on the inside. This creates a nice place to stash the paper doll for easy access.
- Finally add a ribbon to create a strap to carry the activity book like a purse. Glue the ribbon on the inside back of the book.
- After all is dried, the book is ready to gift!
Notes
You can also make your own customized paper doll with my printable paper doll set.