DIY Car Play Mat
Do you need something to keep the kiddos busy? This easy-to-make car play mat will do the trick! Here's how to make it.
What You Will Need
- Felt sheets of green, white, grey, orange, and yellow
- Sewing machine and thread
- Ribbon green
- Scissors
- Pins
- Printable Template
Instructions
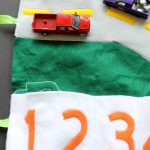
- Start by cutting a 11" by 13" piece of green felt.
- Next cut out:5" by 12" rectangle of white felt4-inch wide curved piece of grey (for the road)1/2" by 2" yellow pieces for road stripesOrange car and numbers – you can print the template here
- Start pinning all of your pieces to each other but not to the large green piece yet.Note: the white piece is one inch longer than the 11-inch wide green piece so that you can create roomy car pockets.
- Now it's time to sew your road lines to the grey road piece. Go ahead and stitch your numbers on the white piece.Note: I used two pieces of grey to create my road, but you can use one felt piece cut into a curve instead, if you prefer that method.
- Pin the car to one corner of the green felt piece and use your sewing machine to stitch it into place.
- Next, flip the green piece over and start pinning your pieces and your ribbon where you want them to be.Gather your felt a little as you pin the white piece into place to create roomy car pockets. Before sewing, fold your project to make sure that everything comes together as you designed it to.
- Use your sewing machine to sew everything into place.Note: I did not sew a line between one and two on the white felt.
- Then just fold up your car play mat.