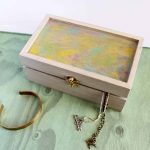
Handmade Jewelry Box
Make a handmade jewelry box for yourself or to give as a gift. I am also going to teach you how to make that gorgeous, glossy marbled top. It is an easy process and you will love how this one looks in your home.
Equipment
- Craft paint (in any colors of your choice)
- Clear adhesive
- Paint brushes
- Measuring Cups
- Mixing Cups
- Stir Sticks
What You Will Need
- Unfinished wood jewelry box with recessed top
- Vintage Wash in two different colors
- EnviroTex Lite Pour On High Gloss Finish
Instructions
Paint the Jewelry Box
- Start by painting your jewelry box to add color and seal the surface. I used the Vintage Wash from DecoArt for this task. Brush onto the surface, allow to sit about a minute, then wipe off with a rag. This is similar to the way you would apply stain.
- Paint every surface and then allow to dry completely.
- The recessed portion of the jewelry box needs to be sealed completely with a clear adhesive all around the outer edges. Allow to dry.
- When dry, move on to mixing the resin.
Mix & Apply the Resin:
- Start by mixing about 6 tablespoons total in a measuring cup. Just add equal parts A and B to the cup and then stir well. You are going to need to mix really well and follow all of the instructions that come in the package.
- Once mixed, add about half of a tablespoon of mixed resin to three separate cups as shown in the post.
- Next add in about one drop of three different colors of craft paint to the resin. Then use stir sticks to mix really well.
- Next pour the clear resin you have left into the recess of the jewelry box. Then use your stir stick to ensure that it goes all the way to the edges and into each corner.
- Then just start drizzling in your colors randomly. Add as many or as little of each of the colors as you desire.
- Then use a clean stir stick to run through the resin and create a marbled appearance. Add more color if desired or just run with what you have. This is where you can get artistic with the finish.
- Remove any bubbles from your resin using the methods discussed in the instructions in your package. Then, set aside for the product to cure completely. Be sure to set where it will not be touched or get any dust or debris in the resin. You will also want to make sure it is on a flat surface.
- TIP: use an empty cardboard box to put upside down on your project while drying.
- Allow to cure at least overnight, then your handmade jewelry box is ready for use. You will love that hidden pop of color on the inside.