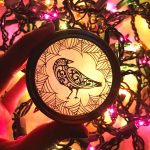
Make Your Own Raven Sun Catcher
Make your raven sun catcher for Halloween. This decor craft is really simple to create and you can even customize with all kinds of Halloween art. Today I’m using my Cricut machine to create this raven and spiderweb art design. Grab a few mason jar lid rings and let’s get crafting today! Add in some Halloween holiday lights and this art project is perfect for party decor too.
Equipment
- Cricut cutting machine
- Cricut Design Space
- Glue
- Standard white paper
- Printer
What You Will Need
- Raven Spiderweb Art design by Jen Goode
- Oil I used regular cooking oil
- Cotton Ball
- Black twine
Instructions
- Go to the raven design in Cricut Design Space and follow the on-screen instructions to print and then cut the art.
- Using a cotton ball, apply some oil to the back of the raven art. Then pat dry with a paper towel or napkin to remove excess oil. This is what makes the paper more translucent to allow light through the art design.
- Apply glue to the inside ring of the mason jar lid. Then adhere art to the inside of the mason jar lid.
- Apply a little glue to the outside of the mason jar lid. Then wrap twine around lid, leaving excess twine to create a little hanging loop at the top of the ring.
- Allow the glue to dry then hang on your window to catch the sun!
Notes
Tip: when you first view the raven art in Cricut Design Space, it appears to be covered by a circle. This is correct. We want the spiderweb and raven to print and then cut into a circle, cropping some of the spiderweb. So, the circle is not flattened with the art, it is merely attached to the art. Also, the art is flattened to a square. This is so that the web and raven shapes are not cut out but only printed.