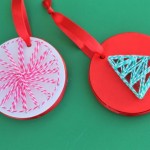
Christmas String Art Ornaments
This simple craft project will create unique Christmas string art ornaments you'll love to see hanging on your tree. They're also great DIY gift ideas!
What You Will Need
- Round wood pieces
- Wood glue
- Industrial hole punch or drill
- Craft paint
- Small nails
- Hammer
- Baker's twine or string or yarn
- Ribbon
- Hot glue and a glue gun
Instructions
- Using a drill or a hole punch, poke a hole at the same location all of your shapes.Note: Optional, you can paint the front, back, and sides of your wood with your favorite craft paint. Let the paint dry before moving on to the next step.
- Stack your shapes and attach them with wood glue between each shape. Allow everything to dry fully before moving on.
- Mark dots where you want your nails to be with a pencil.
- Using a small hammer, insert a nail into each pencil dot. Don't poke through the back of your stacked wood pieces!
- Knot off your baker's twine around the first nail. Wrap your twine around the nails, creating your design. When you reach the end, knot off the twine around your last nail and cut off any excess twine.
- Use hot glue to adhere a piece of ribbon over the exposed edges of your ornament.Finally, tie a piece of ribbon through the hole at the top so you can hang your new ornaments on your Christmas tree.
