I've had a lot of fun coming up with different ways to customize flower pots and knew I needed to try gold leafing a set of them. If you're ready to try making your own gold leaf metal flower pots grab the supplies listed below and keep reading!
Makes 2 Flower Pots
Equipment
- Scraper Tool
- Paintbrush
What You Will Need
Supplies Needed:
- Rusted Metal Flower Pots these are similar to the ones I have that are no longer available
- Krylon Spray Adhesive
- Gold Leaf
- Vinyl
- Painter's Tape
- Transfer Tape optional
Instructions
How to Make DIY Gold Leaf Metal Flower Pots
- The first thing you want to do when making your own customized flower pots is to decide what design you want to add to the pots.
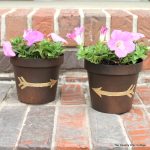
- I used my Cricut to cut two arrows out of vinyl. The design you use doesn't have to be an arrow, it could be an initial, another shape, or even a word. The choice is up to you.
Using Vinyl to Create a Mask
- The color of vinyl you use for this project doesn't matter at all. We are just using the vinyl to create a mask. Basically, we are going to weed out the design we want to be on our finished product. We'll then place the vinyl onto the metal flower pot and use it like a stencil.
Applying Vinyl to Metal Flower Pot
- Before we apply the vinyl to our flower pot we want to make sure it is nice and clean. Using a lint-free cloth, lint roller, or rubbing alcohol wipe down the surface of your flower pot really well and allow it to dry if needed.
- Depending on the design you selected you may need to use transfer tape to apply the vinyl to the flower pot.
- My design is simple so I was able to lift the vinyl off the carrier sheet and just apply it to the flower pot like a sticker.
- To ensure the vinyl is stuck down really well go over the surface with a scraper tool. Pay close attention to the vinyl all around the edges of the design. We want those areas stuck down really well to prevent any spray adhesive from working its way under the vinyl
Apply Painter's Tape to Protect Surface
- Now that we have the vinyl stuck down really well we'll use painter's tape to cover any other areas of the flower pot that are exposed.
- Since we are using a spray adhesive on this project we want to protect our entire surface because it's harder to control where spray adhesive lands and we don't want it anywhere except where we want our design.
- You can see I've masked my flower pot very well.
How to Apply Spray Adhesive
- I recommend reading the instructions on the spray adhesive you're using really well. Just like with spray paints there are recommendations for how long to shake the adhesive as well as temperature requirements. If it's too hot or too cold you may not end up with the results you want.
- Once everything is masked off really well take your flower pot outside and apply a good coat of spray adhesive to it. Don't be shy, you want the whole design area to be covered with adhesive.
Remove Masking from Flower Pot
- After applying the spray adhesive remove all the masking tape and vinyl. You'll be left with your design area of adhesive. Mine is an arrow shape.
- While you're removing the mask the adhesive will dry slightly. This is great, now you can apply your gold leaf easily.
How to Use Gold Leaf
- Be very careful when you remove your gold leaf sheet from the package. Gold leaf is extremely thin. The good news is, even if it rips you can still use it because of the finished look you get with gold leaf.
- Lay your gold leaf sheet over the adhesive design and tap down. Using a soft paintbrush gently go over the design.
- Continue to gently work the gold leaf with your paintbrush. The gold leaf will fall off where there is no adhesive. Keep brushing around the design until you're left with just the design.
How to Seal Gold Leaf for Outdoor Use
- To seal your gold leaf metal flower pot use an outdoor Mod Podge.
- Allow the gold leaf to dry on the adhesive for about 30 minutes. Then apply a coat of outdoor Mod Podge to just the gold leaf design.
- Allow the Mod Podge to dry completely before applying another coat if needed.
- Outdoor Mod Podge should be allowed to cure for 72 hours in a dry room with a temp of 68 degrees or higher. Once it's fully cured it's ready for flowers!
Adding Flowers to Flower Pot
- The final step to our gold leaf metal flower pot is to add flowers and display the finished project.
- Since we'll want to water our flowers after planting them we want to make sure the Mod Podge has had the full amount of time to cure.
- Add your flowers to the pot, add additional soil as needed, and water.