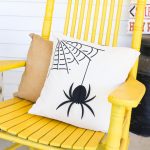
DIY Halloween Pillow with a Spider
Add some fright to your front porch by using your Cricut to make a DIY Halloween pillow!
Equipment
What You Will Need
- Pillow cover
- Testors Fabric Spray Paint
- Stencil material
- Masking tape
- Stencil adhesive
- Paper or cardboard
- Black felt
- Cricut cut file
- Embroidery floss
- Needle
Instructions
- Start by cutting your stencil and spider on your Cricut machine. Cut the stencil from a stencil material and the spider from felt. Then grab your stencil adhesive as well as masking tape to paint your pillow.
- Spray the back of the stencil with the stencil adhesive. Allow to dry. This should dry completely. It will still be tacky but not wet.
- Add paper or cardboard to the inside of your pillow cover to prevent bleed through.
- Then stick the stencil to the front of your pillow cover. Add masking tape and paper all along the outside to protect from overspray.
- Use Testors Fabric Spray Paint over the top of your stencil. Give it a couple of light coats being sure to get even coverage.
- Remove the stencil and allow the pillow cover to dry completely.
- Remove the paper from inside the pillow cover and add the spider to your web. Just use a needle with embroidery floss to hand stitch down the middle.
- Tie off once stitching is complete. Then just add your pillow to the inside to complete your DIY Halloween pillow.