DIY Haunted House
A spooky haunted house craft that the kids can help make to light up your mantel!
Equipment
- Paintbrush
- Hot Glue and a Glue Gun
- Drill with a Hole Bit
What You Will Need
- Unfinished Wood House
- Black and White Craft Paint
- Foamies Halloween Stickers
- Craft Wire
- Battery Operated Tea Light
Instructions
- First, you need to add a hole for the tea light to the bottom of your wood house. Use a drill with a hole bit a little larger than the diameter of the tea light.
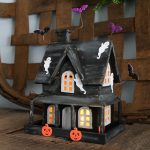
- Then you can start painting the wood house. I am using a distressed paint technique on this house. Dip your brush into a little black paint and remove most of it on a piece of paper. Then quickly move the brush across the house to create a rustic look.
- Then mix white paint with a little black for a soft grey and paint around the windows and doors. You can also whitewash your house with this mixture by adding a little on top of the black and immediately wiping most of it away with a rag. The picture below has this effect on the right and not on the left. You can see what a difference this can make.
- Allow the paint on your house to dry completely. Remember that the kids can help with this project. This paint is totally imperfect and that is part of what makes it spooky! The kids can also grab a brush and help with this part as well. Once the paint is dry, then you can start adding the stickers to the front as well as the roof.
- Want some spooky bats flying around your DIY haunted house? Just add two stickers back to back onto some craft wire. Then curl the opposite end of your wire.
- Then use a little hot glue on the curled end to put your bats on the roof of your house.
- Pop the battery-operated tea light in the hole that you added to the bottom and your DIY haunted house is ready for any room in your home.