DIY Napkin Rings for Fall Dinner Parties
Make these napkin rings for Thanksgiving and any dinner party you are hosting this season.
What You Will Need
- EasyCast Clear Casting Epoxy
- Disposable mixing and measuring cups
- Disposable stir sticks
- Universal Opaque Pigments in red and yellow
- Hot glue gun and glue sticks
- Silicone craft mat
- Metallic paint pen
- Napkin rings
- Mold Release & Conditioner this is optional as I will explain in a minute
Instructions
- I will totally blame the Hot Glue Gun book I wrote for the inspiration for this one. I figured out the method for making these leaves as a direct result of doing so many hot glue projects for that book. It turns out that hot glue on a silicone mat makes a great mold for resin. You can actually do this method with any shape you can draw but we are doing to do it with leaves. So, take your hot glue gun and draw leaf shapes all over the silicone mat.
- Allow those to cool while you mix your resin. Be sure to follow all package directions when measuring and mixing resin as the steps are critical. Then divide your mixture among four small cups. One I left clear then I tinted the others yellow, orange, and red with the opaque pigments.
- Now, you can spray your leaves with the mold release and conditioner but I found it really doesn't make a difference. So, I would do mine without it. Pour your clear resin into each leaf shape but leave room in the leaf for more resin.
- Add drops of each of the three colors to each leaf.
- Use a stir stick to push those around until they are marbled.
- Add more resin if needed to fill up your leaf shapes. Then allow this to cure overnight on a flat, level surface.
- Remove the entire thing from the silicone mat by peeling up.
- The hot glue will peel away from the sides and you are left with perfect, glossy fall leaves for your craft projects.
- I wanted to make these napkin rings double as place cards as well. So, I used a metallic paint pen to mark the initials of each guest on one of the leaves.
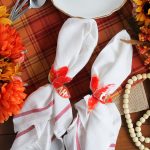
- I then used hot glue to adhere a cluster of these on a wood napkin ring with the monogrammed version on top.
- Then you can just add your DIY napkin rings to your fall table.