No Sew Sweater Pumpkins
Learn how to make sweater pumpkins with this simple DIY tutorial that anyone can make.
Equipment
- Hot Glue and a Glue Gun
What You Will Need
- Old sweaters
- Rubber bands
- Needle
- Hemp cording
- Grapevine pieces
- Twine
- Stuffing
Instructions
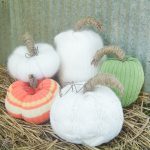
- Start by cutting off the bottom of your sweater. You can use the top and sleeves to make smaller pumpkins but we are going to use the bottom piece for this tutorial.
- Cut your piece into two along the seams on both sides. Each of these pieces will make one pumpkin.
- Turn one of your pieces right side in and gather up each end with a rubber band.
- Then use the opening to turn it right side out.
- Add stuffing until you are happy with the look. Then just hot glue your seam closed. Don't be skeptical! It works and, more importantly, it holds up great!
- Now these next few steps I did not do on all of my pumpkins. I will go through the steps then show you how a pumpkin looks if you stop here. I used hemp cording (found in the jewelry making section). Run your hemp threaded needle all the way through your pumpkin.
- Then run your cording around the outside, then through the middle again. Repeat until you have 5 or so "sections" to your pumpkin. You will need to pull each one really tight to get it to pull together. When you have it looking just right, tie off your cording.
- What happens if you skip this step? You end up with a tall pumpkin instead of a squatty one with sections.
- Now for the stems. I had some mini grapevine wreaths so I took them and cut them in half, then wrapped them with twine. You could totally use a stick that is slightly curved. I have also used driftwood pieces for this step and they look great as well. Think outside of the box for the stem portion.
- Add the stems to the top of each DIY sweater pumpkin with a bit of hot glue.
- I also added some bits of grapevine around the stems for a little something extra.